Understanding Oil Paints
Oil paints are a classic medium that many artists enjoy working with. But when you’re just starting out, all those little tubes with their cryptic labels can be a bit overwhelming.
In this beginner’s guide to oil paints, I’ll explain everything you need to know about how to choose oil paints that are quality and give you vibrant, lasting color.
We’ll go over the key factors to look for when selecting oil paints, like the pigment quality, opacity, and lightfastness. You will learn the difference between artist and student grade oil paints. I’ll also decode all the information you can find on a paint tube’s label, so you can become a pro at reading those tiny labels.
Beyond choosing the right paints, I’ll share some best practices for handling, mixing, and storing your oil paints properly so you can get the most out of your investment.
The goal is to help you understand oil paints inside and out, so you can confidently purchase them and use them to create beautiful works of art. If you’re ready to master oil paints, let’s get started!
What Oil Paints Are Made Of
Oil paints consist of two main components – pigment and a binder.
Pigment
The pigment provides the color. Traditionally pigments were derived from natural sources like minerals, insects, and plants. Nowadays most pigments are synthetically produced from chemical compounds like metal oxides, sulfides, and carbonates. Synthetic pigments provide bright, stable colors and are easier to produce than natural pigments.
Binder
The binder acts as the vehicle to carry the pigment. The binder allows the pigment to be spread onto a surface while providing adhesion to the canvas. With oil paints, the most common binder is linseed oil, but other oils such as poppy seed, walnut, and safflower are also used. The type of oil used will affect it’s drying time, the consistency of the paint, the gloss of the paint as well as it’s resistance to yellowing. You can read more about each binder’s properties in the FAQ section at the bottom of the page.
Manufacturing Oil Paint
To make oil paint, the pigment is first ground into a fine powder.
Pigment start out as large particles, chunks, or crystals that are extracted from natural or synthetic sources. To make them usable in paint, the pigment particles need to be ground down into a super fine powder. A powder that is even finer than talcum powder. This grinding process uses equipment like millstones or modern vertical mills to pulverize the particles down to a size ranging from 1 to 10 microns (for comparison, a human hair is about 100 microns wide).
Having very fine particles allows the pigment to be dispersed smoothly and uniformly throughout the paint, providing even color and smooth application. If the particles are too coarse, the paint’s texture and handling would be gritty and rough rather than smooth.
The pigment is then combined with the binder, usually linseed oil. Additional ingredients like driers or varnishes may also be added at this stage to modify the paint’s drying time or finish.
The pigment and binder are thoroughly mixed together into a smooth, homogeneous paint. The ratio of pigment to binder impacts the consistency – more binder makes a thinner, more fluid paint.
You can watch a video of how oil paint is manufactured.
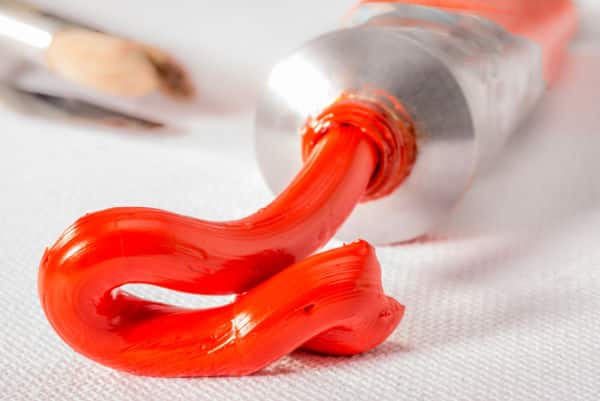
After mixing, the paint is packaged into metal tubes, which are sealed to prevent oxidation until the paint is squeezed out for use. This entire process results in a thick, creamy paint that retains brushstrokes and dries slowly.
Oil paints dry by a process called oxidation, where the oils react with oxygen in the air. This causes the paint to slowly harden and dry over time.
The paint that can be thinned out if required or applied thickly as is. The slow drying time of oil paints allows for blending and glazing techniques and is a very forgiving medium for beginners due to it’s slow drying time.
Oil Paint Properties
As the pigment of each oil paint differs, it causes the properties of the paint to vary. Here are some of the things that vary between oil paints:
Drying Time
Different pigments will dry slower than others. There are various reasons for this which are too technical for this article. It is just good to be aware of this property. As you gain experience with your paints you will eventually see which colors dry slower than others. A good example is Titanium White which likes to dry very slowly. To speed up the drying process a painting medium can be added to the paint.
Tip – Be super careful when touching your painting to see if the paint is dry as one area may be dry while others may not causing you to smudge that area.
Consistency and Texture
The consistency and texture of oil paints can vary widely based on their formulation and the preferences of the manufacturer. The texture and consistency of even the same color can vary between brands. For example one brand of Alizarin Crimson can handle very different to another brand.
These variations can range from a stiff, buttery consistency that holds brushstrokes and knife marks well, to a softer, more fluid texture that spreads easily and offers a smoother finish.
It all depends on what pigment was used to create the color, how much they refined the pigment, what they added to the pigment (binder and additives), etc.
Chroma
Chroma is the intensity / strength of a pigment. Some pigments are naturally stronger than others which affects how you mix with them. Let’s used our Alizarin Crimson color as an example again. The one brand may use a pigment with a high chroma. As a result you just add the tiniest amount into a paint mixture and the Crimson color dominates the mix. A different brand may use a pigment with a low chroma so you find you will need to add a lot more Crimson into the mix in order to get the same change in color.
Toxicity
Some traditional pigments used in oil paints can be toxic (e.g., lead white and the true cadmium colors). It’s essential for artists to be aware of the potential hazards and take precautions, like using gloves to ensure the paint doesn’t come into contact with your skin or working in a well-ventilated area. (I have added a list of toxic pigments into the FAQ section at the end of the article which you can read)
Yellowing
Oil paintings are prone to yellowing over time. The pigment itself doesn’t yellow. It is the binder that yellows. Linseed oil in particular can yellow, especially when the artwork is stored in the dark. This yellowing can affect the appearance of whites and light colors. Some modern binders or alkyd mediums are formulated to reduce this yellowing.
Many artists also varnish their artworks. This varnish may also be prone to yellowing making the artwork underneath appear yellow.
To reduce and avoid yellowing of your paintings :
– use the best quality art supplies you can afford
– use alkyd based mediums when painting with traditional oil paints
– let your paintings dry in a well ventilated area with lots of light (darkness speeds up the yellowing)
– if you varnish your painting ensure it is a UV varnish
– keep your paintings away from tobacco smoke, cooking fumes and other similar pollutants
– clean your paintings occasionally as dust and grime can give a painting a yellowed appearance. Learn How to Clean an Oil Painting
Key Factors When Choosing Oil Paints
When selecting oil paints, here are the most important factors to consider:
Type of oil paint
Artist vs. student grade
Pigment lightfastness
Pigment opacity
Brands and colors
Let’s go through these to learn more about them and why they are important.
Traditional vs Water Mixable Oil Paint
There are two primary types of oil paints available – traditional oils and water-mixable oils:
-Traditional oil paints use linseed oil or other natural oils as the binder. These paints do not mix with water, you thin them using oil or an oil based painting medium.
-Water-mixable oil paints have been engineered to emulsify in water. The binder is modified with added surfactants and solvents so the paint can thin and clean up with water.
Both types use the same pigments to provide color. But they differ in the binder and how they interact with water during mixing, thinning, and cleaning.
Traditional oils rely solely on paint thinner or oil mediums for dilution and cleanup. Water-mixable oils provide versatility in using either water or traditional oil mediums.
Water-mixable oils are a relatively newer product that provides the convenience of oil paint with water solubility. Traditional oils remain popular for their classic handling.
So oil painters have two options – traditional oils that do not mix with water, or the more modern water-mixable oils that can integrate water during the painting process. Both provide rich, vivid color from oil paint pigments.
If you would like to learn more about the differences between the two, you can follow my traditional Oil Painting Course as well as my Water Mixable Oil Painting Course.
Artist vs Student Grade Oil Paints
Not all oil paints are created equal though. They come in different grades of quality known as artist oils and student oils.
Artist-quality oils are designed for dedicated painters aiming to create enduring works. They contain the highest concentration of pure pigment in the binder to provide maximum color vibrancy and archival longevity.
The pigment concentration is typically 20-40% in artist oils. They use high quality, lightfast pigments that will not fade or deteriorate quickly.
Student quality oils compromise on pigment amount to reduce cost for student and hobby painters. They have lower pigment concentrations of around 5-20%.
The pigments may also be from materials that are not as UV resistant. While affordable for practice, student grade paints produce less vibrant or durable results.
If you are looking to create quality artworks that last, it’s worth investing in artist quality paints whenever possible. Though pricier, they deliver better working properties, depth of color, and longevity than lower quality student grades.
If on the other hand you are just creating quick, throw away / practice artworks, then using student quality paints can save you some money.
Pigment Lightfastness
Lightfastness refers to the ability of a pigment to resist fading when exposed to light. It’s an essential factor to consider, especially if you’re creating artwork that you want to last for generations. Pigments with poor lightfastness will fade over time, altering the appearance of the artwork.
Pigment Opacity
Opacity refers to the covering power of a paint. Some pigments are naturally transparent, while others are opaque. The opacity level can affect how the paint layers and mixes with other colors.
Transparent: Allows light to pass through it. As a result the underlying layers of paint will also show through. Transparent paints are ideal for glazing and layering techniques. As the paint is transparent it doesn’t have much tinting strength when mixing it into other colors.
Semi-transparent: Semi-transparent paints allow less light to pass through them, and as a result, the underlying layers of paint or the substrate (like canvas or paper) can be seen to a certain extent.
Semi-opaque: Semi-opaque paints are less transparent than semi-transparent paints but not as covering as fully opaque paints. They allow some light to pass through while obscuring the underlying layers or substrate more than semi-transparent paints do.
Opaque: Opaque paints completely cover the underlying layers, making them useful for base layers and blocking in colors
Brands and Colors
There are numerous brands of oil paint available on the market, each with its unique formulation and color range. Some popular brands include Winsor & Newton, Gamblin, Rembrandt, and Sennelier.
When it comes to colors, starting with a basic palette and gradually expanding is a good approach. A basic palette might include white, primary colors (red, blue, yellow), secondary colors (green, orange, purple), and a few earth tones (burnt sienna, raw umber).
These are the colors I recommend if you are just starting out:
Titanium White, Paynes Grey, Raw Umber, Burnt Sienna, French Ultramarine, Cerulean Blue, Cadmium Yellow, Yellow Ochre, Cadmium Orange, Cadmium Red and Alizarin Crimson.
They will allow you to mix almost any color with minimal effort.
When heading out to buy your oil paint you will notice that there is a ton of info printed onto the tube / label.
Let’s dive in and learn what all these markings mean:
How To Read A Paint Tube Label
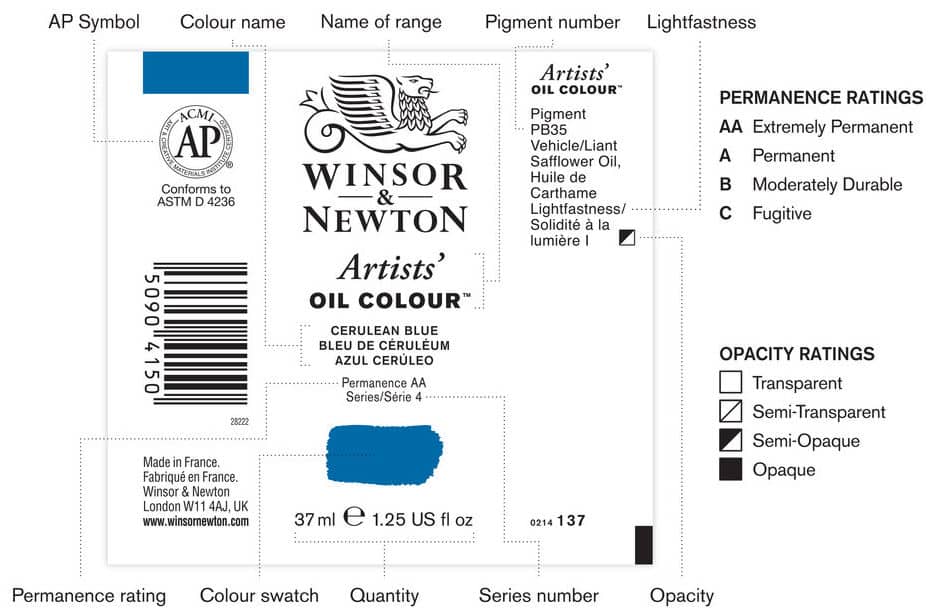
The paint tube label provides essential details about its contents, from the actual color to opacity. While specifics can vary by manufacturer, key information remains consistent. Understanding the label ensures you select the appropriate color and quality for your needs.
On most tubes of paint, you can expect to find the following information:
The manufacturer’s name
The name of the pigment
The color index name
The binder
The manufacturer’s permanence or lightfastness rating
The volume of paint in the tube
Country-specific health warnings
The address of the manufacturer
These details are provided so you can make an informed choice when buying paints. Though it can be tempting to skim over the small print on the label, it can actually make a big difference to your art, Knowing what kind of paint you are buying can help you to apply the colors more effectively and ensure that your works maintain their freshly painted appearance for longer!
How to find the color on the label
When buying paint, the name on the tube is not always the best indicator of the color.
Brands choose names that they think will be most appealing to consumers, not necessarily according to what the paint is like! On top of this, some manufacturers might use the same name as others but there will be different pigments inside. You can even find paints by the same name, the same manufacturer, but made from different pigments.
To get consistent results and the pigments you really want, you need to read the label carefully. By ignoring the brand name, you can get a better idea of the pigments inside which make up the color of the paint you are buying.
To do this you need to look at the color index name.
Color Index Name
Pigments have a color index name which is used to identify what type of pigment it is. These are usually a code of two letters and numbers. Most importantly, unlike paint names, they are a universal standard.
The letter code is as follows:
PR = red.
PY = yellow
PB = blue
PG = green
The numbers identify the specific pigment in the tube.
These codes are really useful because they allow you to compare colors between manufacturers, simply by reading the paint label. Whilst many manufacturers will have their own brand names for their paints, they will all have the same color index codes. You can pick up a tube of paint and compare it directly with another tube using the color index number.
This allows you to recognize what pigments you are buying. It will also tell you whether or not you are about to buy two tubes of paint which are exactly the same!
If there is more than one color index name listed, then the paint is made from a mixture of pigments. These kinds of paints are normally called hues. You can look up the pigment color codes here.
Hue in Paint Names
Every wondered what does ‘hue’ mean in oil paints? You will often see this after the paint name when looking at the tube.
Something to bear in mind when you are choosing paint is that if the label has the word ‘hue’ included in the name, the paint is formulated to mimic the appearance of a traditional pigment using a different combination of pigments.
Pigments can be mixed to either enhance the paint’s lightfastness or to produce a less expensive alternative to the original pigment.
It may also be because the original pigments are no longer suitable to use in paint as it has been found to be toxic. An example of this is Cadmium based paints. As cadmium has been found to be toxic manufacturers are creating similar hues (colors) using a blend of safe pigments. You can tell if a Cadmium color is it’s safe alternative if it has Hue in the name, for example “Cadmium Yellow Hue” is the safe alternative to “Cadmium Yellow”.
Hues can be really helpful if you are just getting started as an artist as they tend to be significantly lower in price than pure pigment colors. Having said that, you need to bear in mind that hue paints might not have as much vibrance as their single pigment counterparts.
If you are looking for greater vibrance and luminosity in your artworks, you will probably prefer to opt for unmixed pigments. Read the label to make sure you know what you are buying!
Opacity Level
As well as information on the color of the paint inside, paint tube labels will also provide some details on the opacity of the paint. Opacity tells you how transparent you can expect the paint to be.
The majority of paint manufacturers don’t provide a straight forward guide to opacity on their labels. Instead, there are usually numbers or ratings that you need to learn to read.
Opacity ratings typically appear as symbols on the back of the tube. Sometimes the symbol might be a white box with a border, a diagonal line, or a two-tone box. These symbols indicate whether the paint is more opaque or more transparent. You can see how these are marked from the image above.
On other labels, the opacity is shown with letters – T indicates transparent, ST is semi-transparent, O is opaque, and SO is semi-opaque.
One of the best indicators of opacity are the paint tubes which provide color swatches painted over black bars. These show directly whether the paint inside is opaque, semi-transparent or transparent, without the need for interpreting symbols.
Information on Lightfastness
Paint labels also provide information on the lightfastness rating of the paint. Lightfastness ratings allow you to predict how resistant a hue will be when exposed to light. Less resistant hues will discolor faster, turning lighter, darker, or greyer over time.
On a paint tube, the lightfastness of the paint is indicated by a rating score. These generally fall into two categories: the American Standard Test Measure (ASTM) and the British system which is called the Blue Wool Standard.
The ASTM provides lightfastness ratings on a scale of 1 – 5, using Roman numerals. This means that ‘I’ pigments are excellent and ‘V’ pigments are very poor. V pigments are not used in artist’s paints as they discolor too quickly.
The Blue Wool system assigns pigments a rating which will range from 1 – 8. In this system however, the lightfastness increases with the number. A rating of 1 – 3 is less resistant and will most likely change within the next 20 years. If the paint has a rating of 4 – 5 you can expect your color to last between 20 to 100 years. The highest ratings are from 6 – 8 and these colors are extremely lightfast, demonstrating little change for 100+ years.
It should be noted that lightfastness is not all that easy to measure. The lightfastness of the paint will vary in different conditions and will probably not be constant over time. For instance, if you are displaying your work in your home, you are very unlikely to have controlled light levels. Your painting will be exposed to more or less light according to the seasons, the time of day, if the artwork gets direct sunlight and even the furnishings in the room. All these factors will affect the lightfastness of your paint.
Nonetheless, it can be useful to use lightfastness ratings as a rough guide to the quality of paint you are buying. Following the system – either ASTM or Blue Wool Standard – you can gauge how durable the paint will be, even though there will be individual variations.
Permanence Rating
Much like the lightfastness rating, the permanence rating on a paint tube label also gives an indication of the durability of the paint. Generally, the two terms are used interchangeably in paint labelling, but they provide slightly different information.
Permanence is used to describe not only the lightfastness of paint but also its resistance to atmospheric conditions including heat and humidity. It also indicates the stability of the binder used in the paint.
Unlike lightfastness, there isn’t a standardized system for permanence. Each manufacturer follows their own guide when it comes to this measurement. The most common are the Blue Wool code system and the star rating system.
The Blue Wool codes are:
AA: Extremely Permanent – This rating indicates that the color has the highest degree of lightfastness and will remain unchanged for over 100 years under museum conditions.
A: Permanent – Colors with this rating are considered highly lightfast and will remain unchanged for 50-100 years under museum conditions.
B: Moderately Durable – These colors are considered moderately lightfast. They will remain unchanged for 15-50 years under museum conditions.
C: Fugitive – Colors with this rating are not lightfast and will fade within 15 years under museum conditions. They are best used in works that won’t be exposed to light constantly or in pieces that are meant for short-term display.
With the star rating system, the more stars the better.
Other manufacturers use in house codes so unfortunately you may need to check on their website for clarification.
Finding the Binder
As well as details about the pigment used for the paint, you can sometimes find out the binder used in the paint manufacture from the paint tube. Most manufacturers will list the binder in an ‘ingredients’ section by name or using a code.
Bear in mind that certain binders will be more expensive than others, with walnut oil usually being the priciest. The binder also influences the paint viscosity. When more binder is added to the pigment, it becomes less viscous and more like a paste.
As a result knowing what binder has been used can tell you more about what to expect from the tube of paint you are about to purchase with regards to the consistency of the paint, how it will handle and it’s yellowing over time.
Series Numbers
When looking at the label on a tube of paint, you might find that there is a series number or letter.
Manufacturers tend to have their own labelling system for their paints. Often they will group colors into certain series, with corresponding prices. These series are identified through letters or numbers on the paint tube label.
As a general rule, the higher the number is, the more expensive the paint will be. Higher numbers are usually made from single pigments which are harder to produce and therefore more costly. If you are looking to keep your materials costs down, look for lower series numbers on the label.
Remember that labels can change!
It’s important to note that paint manufacturers sometimes update the information on their labels.
If you have a favorite paint that you have been using for many years, you may find that one day the paint acts differently or you can’t find that color by name anymore.
It is common for manufacturers to rebrand their paint, giving them new names and appearances to appeal to their customers.
If you refer to the pigment color codes from your empty tube, you will be able to identify if the new paint using the same pigments. You can also check the binder and lightfastness rating to make sure you have a match. Knowing the secret language of the label can be a big help.
Different Brands of Paint
By now you may have realised this, but I want to make sure it is clear as realising this early on will save you many headaches: Each manufacturer has their own recipe for making a specific color.
In other words buying French Ultramarine from one manufacturer is not the same as buying French Ultramarine from another. The pigment(s) used may be totally different. The amount and type of binder and additives may also be different.
The paints may react and perform totally different as a result. One may be thick and grainy, the other may be smooth and buttery. The one may be opaque, the other transparent. They may even look like different colors!!!
As you experiment with different brands and different colors you will eventually find your favorite colors from specific manufacturers.
Getting the Paint out of the Tube
Every drop of paint in your tube is a splash of potential on your canvas. To ensure you get the most out of every tube, always squeeze from the bottom up, much like you would with a toothpaste tube. (You do squeeze your tube of toothpaste from the bottom don’t you?)
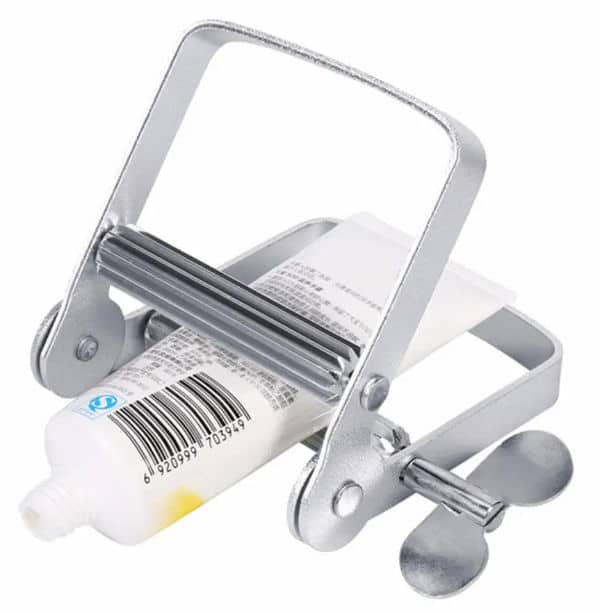
This practice not only ensures a consistent flow but also prevents wastage. As the tube empties, consider investing in a paint tube squeezer. This handy tool ensures that every last bit of paint is utilized, leaving no wastage behind. Not only does this mean more paint for your projects, but it also ensures you’re getting the most value for your money.
Tip – The paint tube squeezer is also great for getting those thicker paints out of their tubes and for those that don’t have hand strength anymore.
(Affiliate Link – I will earn a small commission at no cost to you if you purchase via this link)
Thinning and Blending Your Oil Paints
Caring for Your Oil Paints
Proper care of your oil paints ensures their longevity and maintains the quality of their pigments and binders. Here are some best practices:
Storing: Always store your paint tubes upright in a cool, dry place, away from direct sunlight. This prevents the separation of pigment and binder and protects the paint from extreme temperatures which can alter its consistency.
Note that some separation between the pigment and binder naturally occurs during storage. This is normal so if you squeeze out some paint at the start of a new session and a heap of oil comes out first, just mix it back into the paint before continuing.
Cap Them Right: After using, ensure that the caps are tightly sealed. This prevents air from getting into the tube to oxidize the paint.
Tip – if you lose your cap, use a piece of plastic cling film and an elastic band as a cap.
Avoid Contamination: When squeezing paint onto a palette, avoid direct contact between the tube’s nozzle and other paints. This prevents cross-contamination which can affect the color of your paint in the tube.
Clean the Nozzle: Occasionally, dried paint can accumulate around the nozzle or the thread. Gently clean this off using a paper towel or old lint free cloth to ensure the cap opens easily next time you want to paint and that the cap seals properly.
Temperature Sensitivity: While oil paints are generally robust, extreme cold can make them more viscous, and extreme heat can cause them to become runny. If you’ve stored them in a very cold place, allow them to come to room temperature before use.
Handling: When working, try to squeeze out only as much paint as you need for a session. This minimizes wastage and ensures the remaining paint in the tube stays fresh.
Cleaning Up Oil Paint
As you paint, and after a painting session you will need to clean the paint off your brushes. For this you can use turpentine.
The turpentine breaks down the binder quickly cleaning your brush. Turpentine is however toxic so always paint and clean up in a well ventilated area when using turpentine.
Nowadays many, including myself, are choosing to avoid turpentine for health reasons. I do have a video on how to paint and clean up solvent free which you can watch.
To clean oil paint off your palette, use your knife to scoop off any excess paint and discard it. Then use turpentine on a sheet of paper towel to wash the palette (or use the solvent free method).
Storing Your Oil Paint Between Sessions
If you need to stop painting you don’t have to discard the paint that is on your palette. Seal the entire palette inside an air tight container then place the container in the fridge or freezer. The paint will dry very slowly at these low temperatures and you can often store the paint for a week or more like this without any significant drying. Before starting the next session leave the cold palette on the desk for a while so that the paint can return to room temperature.
Conclusion
In conclusion, understanding the intricacies of oil paints is paramount for every artist aiming to create lasting masterpieces. From the nuances of pigment concentration to the significance of lightfastness, every detail on that paint tube label holds value. As you venture further into your artistic journey, this knowledge will serve as a foundation, ensuring that your choices are informed and your artworks remain vibrant for generations. Remember, the quality of your materials directly influences the longevity and brilliance of your creations. Choose wisely, paint passionately, and let the world marvel at your artistry.
I hope you have found this tutorial helpful. next you will want to learn how to mix your paints correctly. For that you will need to know the Color Mixing Rules.
FAQ
Which is the Best Binder Oil?
Linseed oil is the most commonly used binder oil and is what you will find inside the vast majority of commercially purchased paint tubes.
Each oil binder has its own unique properties, and what might be best for one application or technique might not be ideal for another. Here’s a breakdown of some of the most common binder oils and their characteristics:
Linseed Oil:
Drying Time: Dries relatively quickly compared to other oils.
Finish: Imparts a glossy finish to the paint.
Consistency: Produces a smooth and buttery paint consistency.
Yellowing: Tends to yellow over time, especially in the absence of light.
Poppy Seed Oil:
Drying Time: Dries slower than linseed oil.
Finish: Gives a more satin, less glossy finish.
Consistency: Has a lighter and less viscous texture.
Yellowing: Less prone to yellowing than linseed oil, making it preferred for lighter colors and whites.
Walnut Oil:
Drying Time: Dries at a moderate rate, slower than linseed but faster than poppy seed oil.
Finish: Offers a rich, glossy finish.
Consistency: Produces a creamy texture in paint.
Yellowing: Exhibits less yellowing over time compared to linseed oil.
Safflower Oil:
Drying Time: One of the slowest drying oils.
Finish: Imparts a satin or semi-gloss finish.
Consistency: Has a slightly thinner consistency.
Yellowing: Very resistant to yellowing, often used in whites and pale colors.
In conclusion, the “best” binder oil depends on your needs. Some artists even mix different oils to achieve a desired set of properties.
I personally have never needed to use various oils. I purchase the paint with whatever oil the manufacturer has decided to add to it then thin using either linseed oil or painting medium. If you are just starting out don’t even bother with all sorts of different oils. Commercially purchased oil paint in tubes along with a good quality painting medium to thin the paint is all you need.
Which Pigment are Toxic?
Lead White (also known as Flake White or Cremnitz White): Contains lead and is highly toxic. It’s been largely replaced by non-toxic alternatives like Titanium White and Zinc White, though it’s still available for professional artists due to its unique handling properties.
Cadmium Colors (e.g., Cadmium Red, Cadmium Yellow): Cadmium pigments are toxic if ingested or inhaled. However, the risk is minimal when used in solid paint form. Some manufacturers offer “hue” versions of cadmium colors, which mimic the color without using the toxic cadmium pigment.
Cobalt Colors (e.g., Cobalt Blue, Cobalt Violet): Cobalt pigments can be harmful if ingested or inhaled so look out for their “hue” alternatives.
Chrome Yellow: Contains lead chromate and is toxic.
Naples Yellow: Historically, this pigment contained lead and was toxic, but many modern versions of Naples Yellow are formulated with non-toxic pigments. Avoid the paint if it says “lead antimonate yellow” or has this color code : PY41. Alternately look for it’s “hue” alternative.
Vermilion (or Cinnabar): Made from mercury sulfide, this pigment is toxic. Most modern “Vermilion” paints are hues made from non-toxic alternatives. Avoid those marked with terms like “mercury sulfide” or the pigment code PR106.
Emerald Green (also known as Paris Green): Contains copper acetoarsenite and is highly toxic. Look for terms like “copper acetoarsenite” or the pigment code PG21. This pigment is rarely used today and has been replaced by safer green pigments.
Another way of seeing whether a toxic pigment has been used will be the toxic safety hazard symbol or a warning message on the tube label. This toxic safety hazard symbol contains a skull and cross bones on it.
Note that most oil paints have a flammable warning sign on them due to their oil content. The flammable sign has flames on the inside. These paints are NOT toxic!
Also note that you still get these colors by name so don’t avoid the paint names, just their toxic versions. (
In my experience paints containing toxic pigments are very hard to find nowadays as most manufacturers do not want to expose you, or their employees, to toxic chemicals for obvious reasons.
Pin Me
