
Introduction: Watercolor Mistakes Are Part of Learning
Every watercolor painter, no matter how experienced, has stared at a puddle spreading across the paper and wondered what went wrong. Watercolor is a forgiving medium in some ways and an unpredictable one in others, and that mix of qualities is exactly what makes it such a rewarding thing to learn. The mistakes you make along the way are not signs that you lack talent. They are simply part of how this particular medium teaches you its rules.
Most watercolor problems trace back to one of four things: how much water you are using, the condition or quality of your paper, how your pigments are behaving, and the timing of when you apply each layer. Learning to read these four elements, and how they interact with each other, is really what separates a frustrated beginner from a confident painter. The good news is that these are learnable skills, not innate gifts. Once you understand why a wash turned muddy or why a wet edge dried into a hard, dark line, you gain the ability to prevent it next time, or even use it on purpose for effect.
In the sections ahead, we will walk through ten of the most common watercolor mistakes: from washes that are too dry or too wet, to paper that buckles and warps, to blooms and hard edges that seem to appear out of nowhere. Each one comes with a simple explanation of why it happens and practical steps for fixing or avoiding it. By the end, you will have a troubleshooting mindset that lets you look at a problem on the page and immediately know where to start. Mistakes will still happen, but they will start teaching you something useful every time.
Using Too Little Water
If your brush drags across the paper leaving dry, streaky marks, or your wash comes out patchy instead of smooth, the culprit is almost always too little water. This is one of the most common habits among beginners, and it usually comes from a fear of losing color intensity. It feels counterintuitive to add more water when you want a bold, saturated result, so painters load their brush with mostly pigment and very little moisture. The result is paint that grips the paper's texture instead of gliding across it, leaving gaps, harsh brush marks, and an uneven surface where some areas caught color and others didn't.
Watercolor needs water to move. Pigment suspended in a well diluted mixture flows smoothly across the paper and settles into the fibers evenly, giving you that soft, luminous quality watercolor is known for. Paint that's too thick behaves more like a dry pastel dragged across a rough surface.
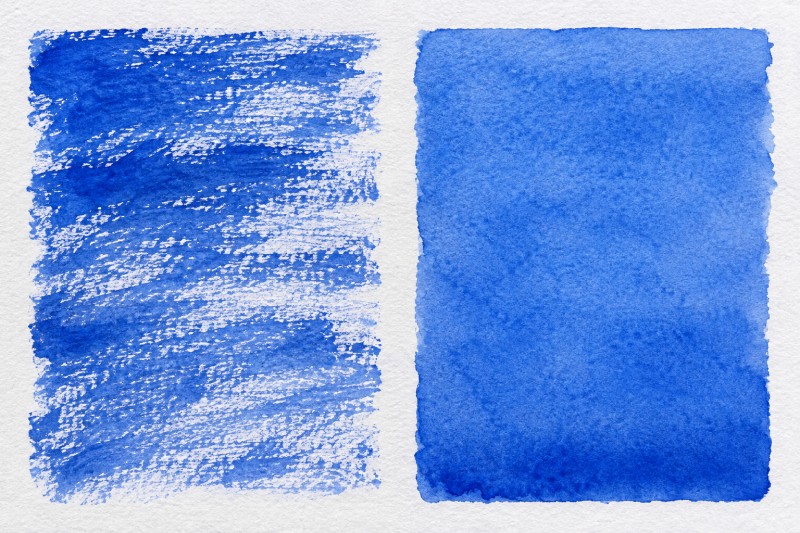
It skips, catches, and leaves the paper looking chalky rather than fluid.
The fix is simple, though it takes some getting used to. Mix a generous puddle of paint on your palette, more than you think you'll need, and make sure it has enough water blended in to move freely off the brush. Before touching it to your painting, test the mixture on a scrap piece of paper. If it drags or looks dry, add more water and test again until the stroke flows smoothly and evenly. Keep that puddle nearby as you work, and reload your brush often. Watercolor mixtures dry out faster than you expect, especially in a warm room or under studio lights, so a puddle that flowed beautifully five minutes ago might already be too thick to use. Get comfortable mixing more than you need each time. It's easier to blot away excess paint than to rescue a wash that's already gone dry and patchy on the page.
Using Too Much Water
If too little water leaves your washes dry and streaky, too much water brings the opposite problem: washes that look pale and watery, color that spreads well beyond where you intended, and puddles that sit on the paper refusing to dry. You might notice your painting is still glistening wet ten or fifteen minutes after you expected it to be touch dry, or that a shape you painted has crept outward into areas you meant to keep clean.
This usually happens when everything in the process is saturated at once: a dripping brush, a runny paint mixture, and paper that already has a wet layer sitting on it. Any one of these on its own is manageable, but combined they take away your control. The water has nowhere to go, so it pools, spreads, and dilutes your pigment until the color barely reads on the page.
A few habits can bring this back under control. Before touching brush to paper, blot the brush lightly on a paper towel or the rim of your water jar so it is wet but not dripping. Check your paint mixture on scrap paper first. It should feel like fluid cream, not like colored water. If you are working on paper that already has a wet wash on it, tilt the board slightly so gravity pulls the excess water and pigment in one direction rather than letting it sit in a puddle. And if you do end up with a puddle you did not want, use a clean, dry brush (sometimes called a thirsty brush) to touch it to the wet area and lift the excess moisture away, rather than pressing more paper towel into it or trying to paint over it while it is still standing in liquid form.
Learning to judge how wet is too wet takes some trial and error, but once you can feel the difference between a controlled wash and a runaway puddle, this mistake becomes much easier to avoid.
Overworking Wet Paper
It's tempting to keep chasing a wash once it's on the paper, especially when a shape doesn't look quite right the moment it's applied. But going back over wet paint again and again is one of the fastest ways to ruin an otherwise good passage. Watercolor paper has a delicate surface, and repeated brushing while it's still saturated breaks down the fibers, roughens the texture, and lifts pigment unevenly. The result is often a patch that looks scrubbed, dull, or oddly gray compared to the surrounding area, even if the original color mix was vibrant.
Blooms are another common side effect of overworking wet paper. When a brush loaded with fresh water or paint touches an area that's starting to dry, it pushes pigment outward in an uneven, blotchy pattern. This is different from the intentional wet-into-wet blending covered in an earlier section (more on managing timing between layers later in this guide). Here, the issue is simply touching the same spot too many times while it's in that in-between state of drying.
The fix comes down to trusting your first stroke. Watercolor rewards confident, deliberate application more than careful fussing. Mix your color, decide on the shape or value you want, and apply it in as few strokes as possible. If an area looks slightly off while it's still wet, resist the urge to correct it right away. Wet paper is unpredictable, and any additional brushwork at that stage usually makes things worse, not better.
If a section truly needs adjusting, the safest approach is patience. Let the area dry completely, then assess it with fresh eyes. Once the paper is dry, you have far more control: you can glaze a thin layer over it, lift color with a damp brush, or add detail without disturbing the fibers underneath. Waiting a few extra minutes for the paper to dry is a small price to pay compared to the muddy, roughened patches that come from repeatedly reworking a wash while it's still wet.
Creating Muddy Colors
You mix a sky blue and a warm yellow, expecting a fresh spring green, and instead a flat, greyish-brown color stares back at you from the page. Muddy color is one of the most frustrating watercolor problems because it seems to appear out of nowhere, even when you started with beautiful, vibrant paint straight from the tube.
Mud usually comes from combining too many pigments at once. Every color you add to a mix shifts it further from clarity and closer to a neutral gray-brown, especially when complementary colors like red and green, or blue and orange, end up mixed together by accident. A wash that starts as a clean blue-green can turn muddy the moment a stray touch of red-brown enters the mix, whether from an unwashed brush, a dirty water jar, or a palette well that still holds leftover paint from an earlier project.
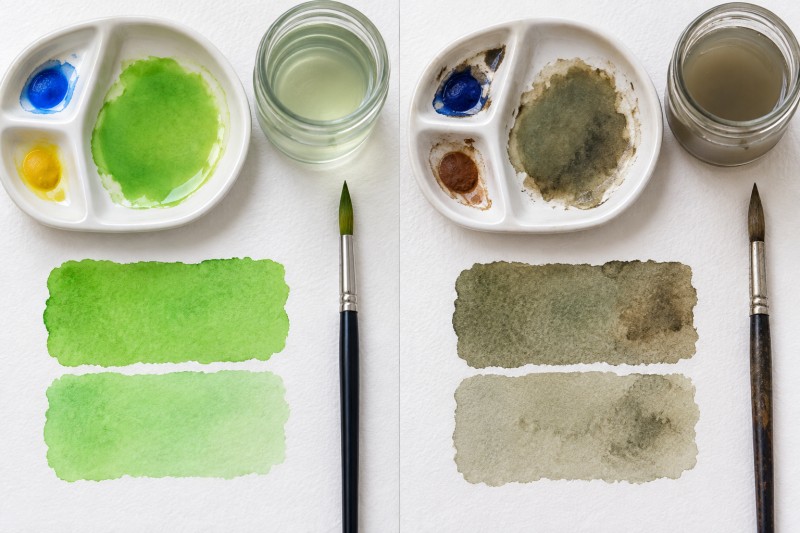
Dirty water is a sneaky culprit. Watercolor water clouds quickly, and once it turns a murky gray-brown, every color you rinse into it and reload comes back slightly duller than before. The same goes for brushes that are not rinsed thoroughly between colors. A "clean" brush that still carries a trace of yesterday's burnt sienna will quietly muddy your next mix of cadmium yellow.
To keep colors clear and lively, limit most mixes to two or three colors at a time. Simple mixes are easier to control and far less likely to slide into mud than combinations involving four or five pigments layered on top of each other. Rinse your brush in clean water between colors, and change that water often, especially during longer painting sessions when it can look deceptively clear even after it has picked up plenty of pigment.
Your palette matters too. Keep a dedicated clean space for mixing new colors rather than stirring directly into a well that already holds old, dried paint or leftover mixtures. A quick wipe with a damp paper towel between mixes takes only a moment and makes a noticeable difference in keeping your colors bright and true to your original intention.
Not Letting Layers Dry Before Adding More Paint
Adding a new layer before the previous one has dried is one of the most common ways a promising watercolor painting turns disappointing. A crisp shape you painted ten minutes ago can suddenly bleed into your new brushstroke, edges soften when you wanted them sharp, and small details you were building up simply vanish into a soupy patch of color. When this happens across several areas of a painting, the whole piece can start to look muddy and out of control, even if your color mixing was sound.
It helps to understand that painting into wet paint is not always a mistake. Wet-on-wet is a legitimate and beautiful watercolor technique, used deliberately for soft skies, blended backgrounds, and organic textures where you want color to spread and merge on its own. The trouble comes from doing this by accident, when you intend to place a controlled, separate layer on top of dry paint (wet-on-dry) but the paper underneath is still damp. That is when hard-edged shapes turn fuzzy, glazes lift the layer below instead of sitting on top of it, and fine lines dissolve into blooms rather than staying crisp.
The simplest way to avoid this is to check the surface before you paint. Wet paper has a visible sheen or shine to it, while dry paper looks flat and matte. Get in the habit of glancing at your painting from a low angle, where reflected light makes any remaining dampness obvious even when the paper looks dry from straight above. If you can see any shine at all, wait longer.
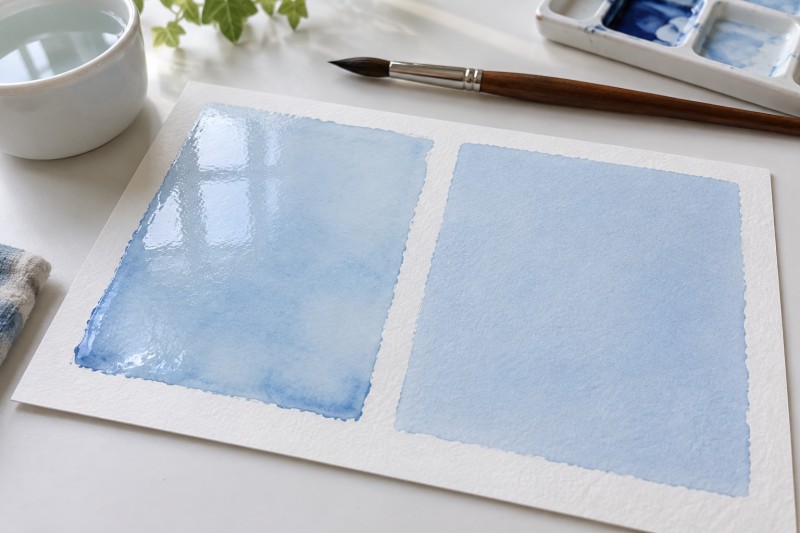
Watercolor paper often takes several minutes to dry fully, more in humid conditions or with heavier washes, so resist the urge to rush back in just because the surface feels dry to a light touch.
If you are working on a time limit, a hair dryer can speed things along, but use it gently. Keep the dryer on a low or cool setting and hold it several inches away from the paper, moving it steadily rather than focusing heat on one spot. Blasting a wet wash with hot air up close can disturb the pigment, create unwanted texture, or cause the very blooms and hard edges you are trying to prevent (a topic covered in more detail later in this article). A little patience, or a little airflow, is far easier than trying to rescue a layer that bled where it shouldn't have.
Skimping on Paper Weight or Quality
If your washes look patchy, your paper pills up under the brush, or the surface tears when you lift a layer, the problem may not be your technique at all. It may be the paper itself. Regular drawing or printer paper simply isn't built for watercolor. It has little sizing (the coating that controls absorption), so water soaks in unevenly, fibers loosen and ball up under a wet brush, and repeated strokes can wear right through the sheet. You'll also notice colors drying blotchy or dull, since thin paper can't hold pigment the way watercolor paper does.
Watercolor paper is made to take on water without falling apart. It has more sizing to slow absorption, giving you time to blend and lift color, and enough thickness to survive multiple washes and layers without disintegrating. As a general guideline, look for paper rated at least 140 lb (300 gsm). This weight strikes a good balance for most beginner and intermediate work: heavy enough to handle wet techniques, but still affordable enough for practice. If you plan to use a lot of water or build up several layers in a piece, heavier is better; lighter papers below this weight are best reserved for quick sketches or dry brushwork.
Choosing suitable paper won't just improve how paint behaves on the surface, it also affects how well your paper holds its shape while wet, which is where the next common mistake comes in.
Ignoring Paper Buckling and Warping
Even good quality watercolor paper will buckle if it isn't secured before painting begins. As the paper absorbs water, the fibers expand, and if the sheet is left loose on a table, it warps into hills and valleys. Once that happens, water and pigment naturally pool in the low spots, leaving dark patches or blotchy washes that have nothing to do with your brushwork and everything to do with an uneven surface underneath.
This warping happens because paper only expands where it gets wet, and without something holding it flat, it dries unevenly, cockling as it goes. A wash that looked smooth while wet can dry with hard rings or strange tide lines simply because the paper shifted underneath the paint.
The fix is to secure your paper before you start painting, not after you notice a problem. Tape all four edges down firmly to a rigid board using painter's tape or gummed paper tape, making sure the tape overlaps the paper edge evenly on all sides. This keeps the sheet under tension as it absorbs water, so it dries flat instead of rippling.
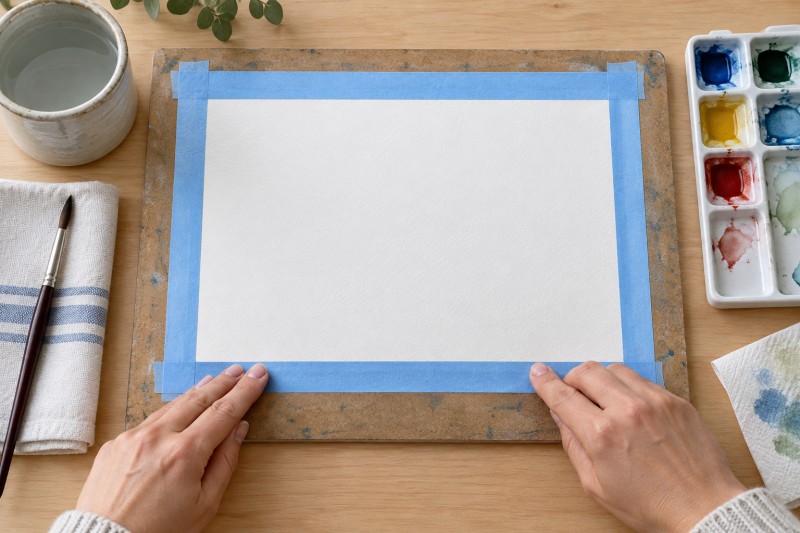
If you are working with thinner paper, taping becomes even more important since lighter sheets warp more easily and dry unevenly faster than heavier stock.
If a finished painting still ends up with some warping despite your best efforts, it can usually be corrected. Place the dry painting between two clean, dry sheets of paper, then stack several heavy books or boards on top and leave it for a day or two. The steady, even pressure will gradually press the paper back flat without damaging the paint layers.
Getting Hard Water Edges and Unwanted Blooms
You've laid down a smooth wash, stepped away for a minute, and come back to find a dark, jagged line creeping across your paint, or a strange cauliflower-shaped bloom where you didn't want one. These marks, sometimes called backruns, happen when water and pigment are drying unevenly on the paper.
Here's what's going on: as a wash dries, pigment particles get pushed toward the edges of the water as it evaporates, settling in a concentrated line. If you then touch a damp brush, extra water, or even fresh paint to an area that's partway dry, the new moisture pushes against the drying edge and drags pigment with it. The result is that telltale dark border or a soft, blooming shape spreading outward from the point of contact.
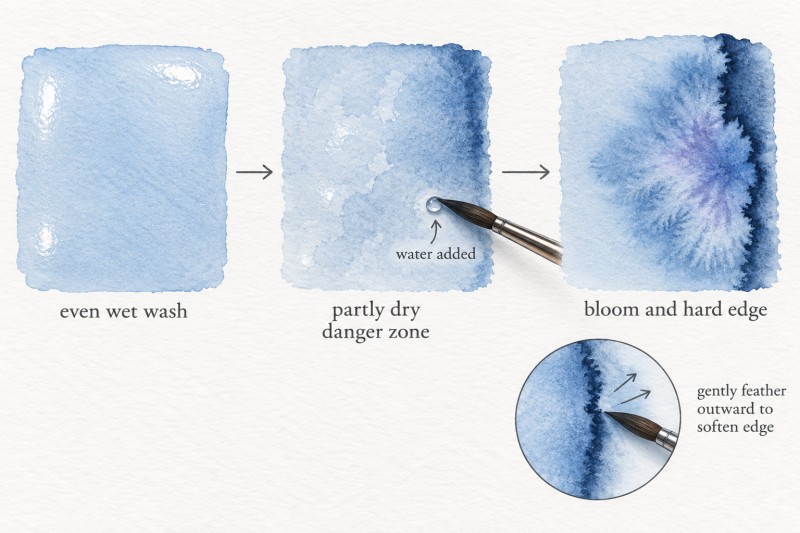
The best defense is paying attention to your paper's sheen while a wash is drying. A wet wash has an even, glossy shine across its surface. As it dries, you'll notice the sheen becoming patchy, duller in some spots and still glossy in others. This is the danger zone. Adding any water or paint while the surface is in this uneven state is what triggers hard edges and blooms. Wait until the sheen is completely gone and the paper looks matte all over before working back into that area.
If you notice a hard edge forming while the paint is still workable, you can often soften it by lightly touching a clean, damp brush to the line and gently blending it outward. Work quickly and with a light touch, since scrubbing at a half-dry wash can lift color unevenly or roughen the paper.
It's worth remembering that blooms and soft edges aren't always mistakes. Many watercolor artists use them deliberately to create cloud-like skies, the delicate petals of a flower, or a mottled, textured background. Once you understand how and why these effects form, you can start dropping water or paint into a drying wash on purpose, choosing the moment rather than being caught off guard by it.
Using the Wrong Brush or a Worn-Out Brush
Even when your water and paint mixtures are right, the wrong brush can still work against you. A stiff synthetic brush with no spring might refuse to hold a smooth bead of water, so your wash comes out patchy no matter how carefully you mixed it. A worn round brush with a frayed or split tip will not hold a point, making it nearly impossible to paint a clean line, a crisp leaf edge, or a controlled detail. If you find yourself fighting the brush more than the painting, the tool itself may be the problem.
A good watercolor brush needs to do two things well: hold a generous amount of water and paint, and release that paint evenly and predictably as you move across the paper. Cheap or damaged brushes often fail at one or both. Bristles that splay out unevenly will drag streaks through your wash, and a brush that cannot hold enough liquid will force you to reload constantly, breaking up strokes that should flow as one continuous motion.
You do not need a large collection to get started. A medium round brush, somewhere around a size 8 to 12, works well for most general painting and can transition between broader strokes and moderate detail. For skies, backgrounds, and large washes, a bigger round or a flat wash brush will help you cover the paper quickly and evenly before it starts to dry unevenly. For fine details like eyes, small highlights, or delicate linework, keep a smaller round brush, around a size 2 to 4, that still comes to a sharp point when wet.
Test any brush before committing to it by dipping it in clean water and checking whether it snaps back to a fine point. If the bristles stay splayed or bent, it is time to retire that brush to less demanding tasks, like mixing paint or applying masking fluid, rather than relying on it for your finished work.
Trying to Paint Every Detail at Once
It's tempting to jump straight to the fun part: the whiskers on the cat, the veins in a leaf, the texture on a brick wall. But adding fine detail before the underlying painting is established is one of the most common reasons a watercolor ends up looking busy, flat, or strangely unfinished, even when every individual mark was carefully placed.
Watercolor rewards painters who work from large to small. Start by blocking in your major shapes and value groups, the light areas, mid-tones, and darks, before picking up a small brush for anything specific. This first pass should look almost abstract: simple shapes of color that establish where the light is coming from and how the composition reads from across the room.
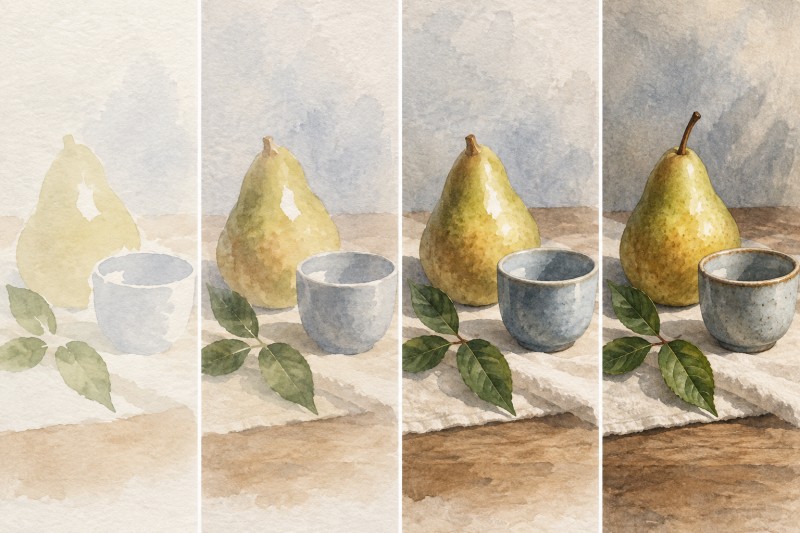
If those big shapes are not working, no amount of detail will rescue the painting, and any detail you have already added will likely need to be painted over or lost anyway.
Preserving your highlights early matters just as much. Once an area is covered in even a light wash, it is difficult to get back to bright, clean white paper. Decide early which areas need to stay untouched or nearly untouched, and work around them rather than trying to lift color out later.
Save your darkest values and sharpest details for last. These final accents, a crisp shadow edge, a defined eye, a strong line of dark foliage, are what give a painting its sense of focus and depth. Adding them too early, before the surrounding values are in place, often makes the whole piece look disconnected, since there is nothing yet for those details to sit against.
A helpful habit is to step back from your painting regularly and squint at it. If the large shapes and values read clearly from a distance, you are ready to add detail. If the painting still looks unclear or unbalanced, resist the urge to add more marks and instead ask whether the underlying structure needs adjusting first.
Quick Watercolor Troubleshooting Checklist
Before you touch your brush to fix a problem, it helps to pause and ask a few quick questions. This kind of mental checklist can stop small issues from turning into bigger ones, and it takes only a few seconds once it becomes habit.
Try running through these questions before continuing any painting:
- Is my paper too wet or too dry right now? Check the sheen. A glossy shine means it is still wet, while a matte surface means it is ready for the next layer.
- Is my brush clean? A brush carrying leftover color from a previous mix can quietly dull or muddy your next wash without you noticing until it is too late.
- Does this layer need more drying time? If you are unsure, wait a little longer. Adding paint too soon is one of the easiest ways to lose detail or create unwanted blooms.
- How many colors am I mixing right now? If you have lost track, or if you are layering more than two or three pigments, stop and rinse your palette before continuing.
- Am I trying to fix something that does not actually need fixing? Not every uneven edge or slightly pale patch is a mistake. Sometimes stepping back reveals that the painting is fine as it is.
Getting into the habit of asking these questions before every new stroke, rather than reacting after a problem appears, is one of the simplest ways to build control in watercolor. It also helps you catch the specific issues covered earlier in this article while they are still easy to correct, instead of after the paint has dried and set.
Conclusion: Practice Control, Not Perfection
Every one of the mistakes covered in this article comes down to the same handful of variables: how much water is on your brush, how wet the paper is, how many pigments are mixed together, and how much patience you give each layer before moving on. Watercolor rewards painters who slow down and pay attention to these details, not painters who get everything right on the first try.
A useful habit is to keep your "failed" paintings instead of tossing them. Pin a few to the wall near your workspace. Muddy passages, hard edges, and buckled corners are actually good teaching tools once the frustration wears off, because they show you your own patterns. Maybe you always overwork the same corner of a wash, or you consistently reach for a third color when two would have been cleaner. Recognizing a repeated mistake is often the fastest way to stop making it.
Scrap paper is your best friend while these habits are forming. Before starting a real piece, spend a few minutes practicing a flat wash, then a graded wash, then try layering one wet-on-dry glaze over a dry shape. Mix two colors together and watch how they behave when the paper is soaking wet versus just damp. Drop wet paint into a wet passage and watch how far it spreads. None of this needs to look good. The goal is simply to feel how water, pigment, and paper interact before you commit to a finished painting.
Control in watercolor is built through repetition, not talent. Painters who seem to have an easy relationship with the medium have simply made these same mistakes many times over and adjusted accordingly. Give yourself permission to do the same, and let each imperfect painting move you one step closer to predictable, confident results.
Muddy colours!
Do well fine following a lesson, but more challenging on my own. The theory does not seem to get to the tip of my fingers yet.
I know… practice more regularly 😆
Great tutorial. Thanks.
the biggest practical reason you get muddy colours is when adding complementary colours together. Sometimes it happens accidentally, other times it’s when you are wanting to mix a darker version of the colour. When trying to mix the darker colour, first add the next colour down on the colour wheel before adding the complimentary. That keeps the colour vibrant.