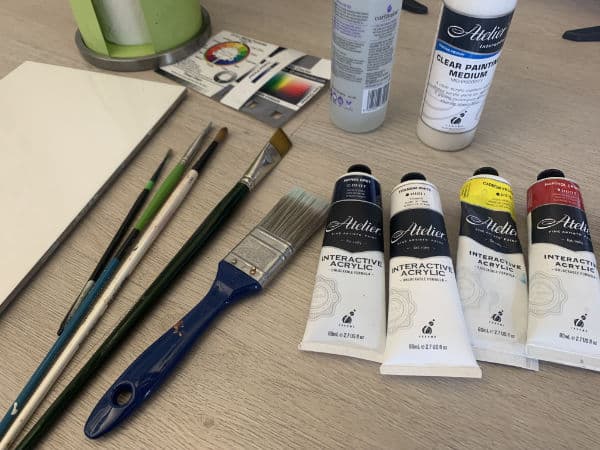
Keen to dive into acrylic painting? Acrylics are perfect for beginners — they’re versatile, quick-drying, and forgiving, which means you can experiment freely without worrying too much about mistakes. Like any art medium, though, they have their quirks. Whether you’re exploring colour mixing, choosing your tools, or just getting comfortable with the brush, these tips will make it easier to get started. Let’s jump in!
1. Choosing Paint
Note: this page contains affiliate links to products on Amazon. If you purchase through the links I will earn a small commission for the sale at no extra cost to you.
The range of acrylic paints available can feel overwhelming at first so let’s break down what types of acrylic paint you get.
Acrylic paint is made from pigment particles suspended in an acrylic based binder. The more pigment in the binder, the better the paint will cover your surface, giving more vibrant colours. Since pigment is the costly part of paint, it’s worth understanding what you’re getting for the price.
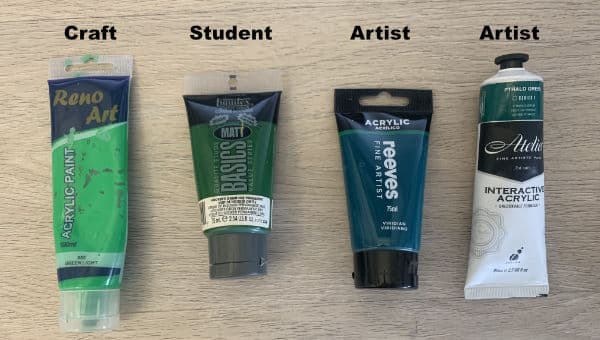
Acrylic paint usually falls into one of three categories:
Craft-grade paint: Least expensive, with the least pigment
Student-grade paint: More expensive, with more pigment
Professional or artist-grade paint: Most expensive, with the highest pigment content
For beginners, a “good” student-quality paint is often the best choice. Student-grade paints have enough pigment to give strong colours and consistent coverage, but they’re also affordable and easy to work with. Look for brands known for reliable quality and availability, like Winsor and Newton’s Galeria or Liquitex Basics.
Professional-grade paints are highly pigmented and great for detailed work, but they’re often overkill for beginners and can be pricey. On the other end of the scale, craft paints can be tempting because of the price, but they contain less pigment, resulting in thin, washed-out colors. Many beginners find craft paints frustrating to work with due to this low pigment ratio. Especially when it comes to mixing colours together. Different pigment colours have different tinting strenghths which can make one colour quickly overpower another when mixing them together. This is especially that case with craft paints, causing frustration and may even put you off acrylics altogether.
To get started, aim for a few basic colours in a student-grade paint and focus on learning to handle the medium itself. You’ll get a much better feel for the paint’s possibilities without breaking the bank.
Once you are more accustomed to using acrylic paints and want to start painting in earnest, then you can upgrade to artist quality paints.
2. Choosing Colours
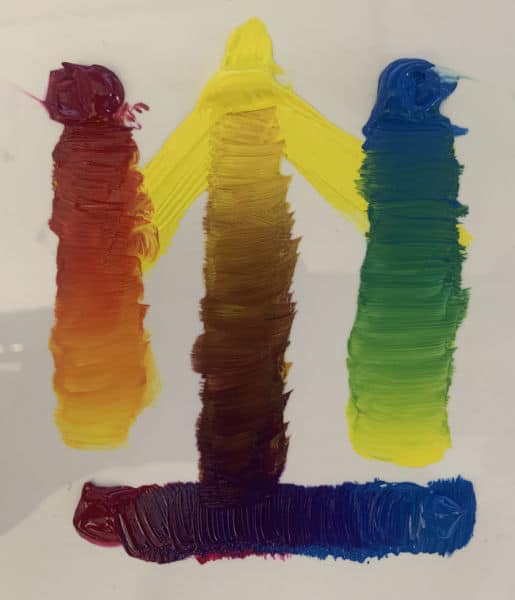
The colours you choose make up your unique palette, and as a beginner, it’s tempting to buy every colour you see. However, starting simple is often best. Here are three basic palette options to consider:
Monochrome Palette: Using just black and white (or any colour plus white) is a fantastic way to learn about values — how light or dark a colour is. Working in monochrome helps you master blending, shading, and layering without the extra complexity of full colour mixing. Once you’re confident, you can start introducing more colours.
Primary Palette: This includes one red, one blue, and one yellow, plus black and white. With these primary colours, you can mix nearly any hue you like, which is an invaluable skill to develop. The only catch is that each primary colour comes in different variations. So, which do you choose?
Colours vary not just by hue (e.g., red, yellow, blue) but also by “colour bias” — a subtle warm or cool quality each colour can have. For instance, Ultramarine Blue has a warm bias, while Cerulean Blue leans cool. This bias affects how well colours mix together. For example, a warm blue and a warm yellow will mix to create a rich, vibrant green, while a cool yellow and cool blue produce a more muted shade. This leads me nicely to my preferred suggestion for selecting your initial paints to purchase:
Split Primary Palette: To cover all your mixing bases, many artists start with a split primary palette. This includes both a warm and a cool version of each primary colour: a warm red (Cadmium Red), a cool red (Alizarin Crimson), a warm yellow (Cadmium Yellow), a cool yellow (Lemon Yellow), a warm blue (Ultramarine), and a cool blue (Cerulean Blue), along with a black (Paynes Grey is a good one) and a white (Titanium White). This palette provides a broader range of colours and helps you mix more vibrant colours.
Starting with a limited palette not only makes colour mixing more manageable, but it also allows you to focus on technique without feeling overwhelmed. Plus, as you mix and experiment, you’ll develop a deeper understanding of how colours interact, which is essential for creating harmonious paintings.
3 Painting Surfaces
When learning to paint, it’s essential to practice as much as possible without feeling pressured to keep every piece. Even seasoned professional artists will tell you that not every painting turns out a masterpiece.
In the beginning, the process is far more important than the outcome, so expensive canvases might be a waste and could discourage you from experimenting freely.
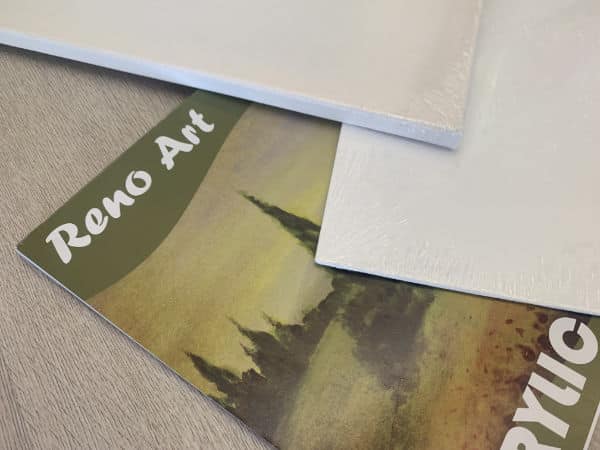
One budget-friendly option is acrylic or canvas paper pads. These pads come in various sizes, with tear-off sheets that allow you to try different techniques without worrying about “messing up.” You can discard, keep, or reuse each sheet as needed. As you gain experience, you can upgrade to canvas panels, which are sturdier than paper yet more affordable than stretched canvases, providing a more permanent surface to work on.
When you’re ready to invest in proper canvases, be cautious with budget options from stationery shops or supermarkets. These canvases often have a thin, rough texture and don’t hold paint well, which can lead to frustration as the paint may not behave as expected. Low-quality surfaces can make blending and layering difficult and might even warp when you apply paint.
To avoid disappointment, look for reputable brands of student-grade canvases. Starting with a reliable, mid-range surface can make all the difference, helping you avoid unnecessary challenges as you focus on developing your skills.
4. Choosing Brushes
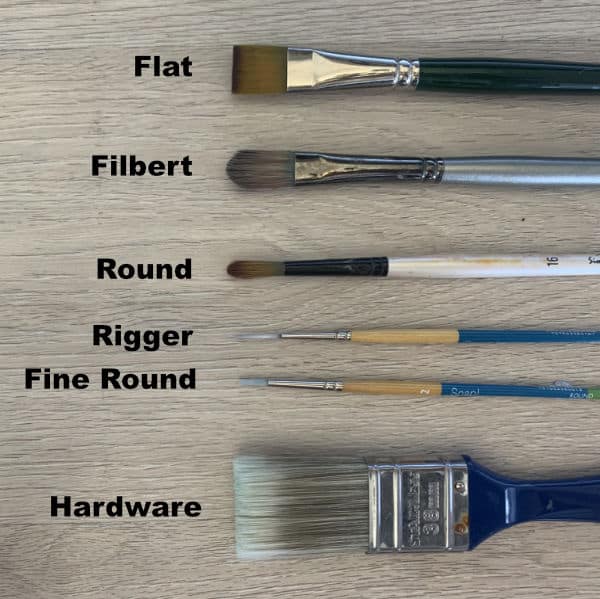
You don’t need to splurge on expensive brushes when you’re starting out. A cheap set of bristle brushes from the dollar store is great for rough blocking in and scrubbing work.
Synthetic brushes, such as those made from Taklon, are affordable and effective for the more detailed work. Taklon brushes are designed to mimic the smoothness of natural sable, giving you control over your strokes without the hefty price tag. They’re softer than bristle brushes, which helps with blending and leaves fewer streaks, yet firmer than watercolour brushes, which are often too soft to move acrylic paint effectively.
A good starter set includes a few basic shapes in small, medium, and large sizes:
Flat Brushes: Ideal for bold, sweeping strokes and for covering larger areas.
Round Brushes: Great for detailing and creating fine lines.
Filbert Brushes: (Like a flat brush but with rounded edges). These brushes are versatile for creating sharp edges and blending seamlessly.
You may also want a large, inexpensive synthetic bristle brush from a hardware store (around 2.5 cm or 1 inch wide). This type of brush is excellent for covering large backgrounds quickly.
In addition to brushes, gather a few other essentials: plenty of paper towels or cloths for cleaning, a fine mister bottle to keep your palette moist, and two water containers — one for rinsing brushes and another for mixing water into paint. These tools will make painting smoother and help extend the life of your brushes.
As you paint, remember that each brush has its purpose, and experimenting with different strokes will help you discover their unique effects. When you’re ready to expand your collection, you can look for specialty brushes like fan or angular brushes to add more variety to your technique.
5. Tips on Mixing Colours
Mixing colours is one of the most exciting parts of acrylic painting, but it can also be tricky at first. Here are some tips to help you get comfortable with it.
Start Light, Add Dark: Always start with the lighter colour and gradually add the darker colour. Place a small amount of the darker colour on the edge of the lighter pile, then blend a little at a time until you reach the desired shade. This technique of “sneaking up” on the colour prevents you from accidentally going too dark, which can waste paint.
Save Your Mixes: If you accidentally mix too much of a colour, don’t worry. You can store it in a small, airtight container and pop it in the fridge for use in your next session. This is also handy for colours you know you’ll need later, such as large background areas like skies. Keeping a consistent colour mix can save you from having to match a shade halfway through your painting.
Return Paint to the Tube: Unmixed paint can be carefully returned to its tube with a palette knife. Hold the tube of paint upright. Place the excess paint over the tube’s opening, then gently tap the closed end of the tube on a table until the paint drops back inside. This way, nothing goes to waste.
Use a Colour Wheel: A colour wheel is invaluable when learning to mix. It helps you understand the relationships between primary, secondary, and tertiary colours. Using complementary colours (opposite each other on the wheel) can reduce the intensity of a colour, which is useful for creating more natural, subdued hues. Bright colours straight from the tube are rarely seen in nature, so learning to mix subtle tones is key.
Use a Color Buster Color Mixing Tool: The Color Buster is a tool I developed to help beginners with their colour mixng. It basically finds the colour you are wanting to mix and tells you how to mix it. You can click the image above to learn more about this handy tool.
Experiment Freely: Don’t be afraid to make “mistakes” when mixing. Colour mixing is a skill that grows with practice, and experimenting will teach you a lot about the properties of different pigments.
Make Colour Charts: Keep a few notes on successful mixes or interesting effects as you go, or go all out and make yourself a set of colour charts using all the paints in your collection. These are great references for future projects as you can then just look up the colour you are trying to mix and instantly see which colours will give you that result.
Mixing is a learning process, so give yourself time to develop an eye for subtle shades and combinations. With patience and practice, you’ll soon be able to create the colours you need quickly and with ease.
6. Using Paint
Learning to handle acrylic paint can take some practice, but a few key techniques will help you get the most out of your materials.
Use a Palette Knife for Mixing: Although it’s tempting to use your brush for mixing small amounts of paint, it’s better to use a palette knife. Palette knives come in different shapes and sizes; having a small, medium, and large one on hand gives you flexibility depending on the amount of paint you’re mixing. Mixing with a palette knife keeps your brushes cleaner and prevents paint from seeping into the ferrule (the metal part of the brush), which is difficult to clean and can damage your brush over time.
Load Your Brush Properly: When applying paint, don’t skimp. Load one side of the brush with a generous amount of paint, then flip it over to load the other side as well. This allows you to cover the surface more evenly and makes blending easier. If you use too little paint, you’ll struggle to achieve full coverage, and blending will be more challenging.
Avoid Overworking the Paint: Acrylics dry quickly, so work efficiently rather than repeatedly brushing over an area, which can lead to streaks and even lift the paint from the surface. If you’re tyring to get a smooth shading, use swift, deliberate strokes then allow the layer to dry before adding another layer over it.
Experiment with Consistency: Acrylics are versatile and can be thinned with water or thickened with mediums to achieve different effects. For a light, transparent wash, add water until the paint flows easily. For thicker, textured strokes, consider using a gel medium to keep the paint flexible and prevent cracking as it dries. Experimenting with different consistencies will help you explore the range of effects acrylics can offer.
Don’t Be Afraid to Layer: Acrylic paint works well in layers, allowing you to build depth and richness gradually. Start with broader, more general colours and shapes, and gradually add detail and adjustments with each layer. Since acrylics dry quickly, you can build up layers in a single session without waiting too long.
By practicing these techniques, you’ll gain a feel for the paint’s behaviour and how to use it to your advantage. With time, applying paint will become second nature, allowing you to focus on your creativity and expression.
7. Cleaning Brushes
Proper brush care is essential for extending the life of your brushes and maintaining their performance. Acrylic paint dries quickly, so cleaning your brushes regularly and thoroughly is crucial.
Rinse Often: When switching colours, especially from a darker to a lighter shade, rinse your brush well to avoid colour contamination. Keep a large container of water nearby for rinsing, and ideally, use a container with a mesh screen at the bottom. This screen allows you to gently rub your brush against it, which helps dislodge paint from the bristles more effectively. Special brush-washing buckets are available with a built-in mesh, but you can make your own by placing an upside-down stainless steel sieve at the bottom of a regular container.
Don’t Soak Brushes Upright: Never leave your brushes standing upright in the water container, as this bends the bristles permanently and weakens the glue that holds the bristles in place. The water also absorbes into the brush handle causing it to crack. Instead, wash the brush thoroughly and lay it flat to dry, or, if possible, hang it with the bristles pointing down.
Deep Cleaning: After finishing a session, give your brushes a deeper clean. Use mild soap or a brush cleaner, working it through the bristles gently to remove any lingering paint. Rinse thoroughly until the water runs clear, then reshape the bristles with your fingers before leaving them to dry flat.
Avoid Hot Water: Use only cool or lukewarm water when cleaning acrylic brushes, as hot water can damage the bristles and loosen the glue inside the ferrule, leading to shedding.
Storage Matters: Once dry, store your brushes flat in a holder or case that keeps the bristles free from bending. Proper storage keeps them in shape and ready for your next painting session. I use storage drawers to store my equipment. One drawer for the paint tubes and another for the brushes. When I am ready to paint I just out these two drawers and place them on the table beside me.
Keeping brushes clean doesn’t just extend their life—it also helps ensure consistent, smooth results as you paint. Taking these small steps will protect your brushes from damage and make them last a lot longer.
8. Before You Begin
Before you start painting, preparing your surface and workspace properly can make a big difference to the painting experience.
Tone Your Canvas: It can be challenging to judge colours accurately on a bright white canvas, as white reflects light and can throw off your perception of value (how light or dark a colour is). To avoid this, try toning your canvas with a mid-value colour before you begin. Use a thinned-down acrylic paint in any neutral or muted shade, such as grey, warm beige, or even light earth tones. I tend to use Burnt Sienna when I tone my canvasses. Apply a light wash with a brush or sponge and then quickly wipe off the excess with a paper towel or cloth, leaving a soft, even tone. This toned background will help you assess your colours and contrasts more accurately as you paint.
Create a Small Workspace: If you’re new to acrylics, keep your paintings small to start with. Acrylics dry quickly, so working on a smaller surface allows you to get familiar with techniques like blending and layering without feeling rushed. It’s also easier to keep control over details on a small canvas, which can be encouraging as you build confidence.
Organise Your Materials: Having everything within easy reach can make your painting session more enjoyable and efficient. Set out your paints, brushes, water containers, palette, and any other tools (like palette knife & mister bottle). Arrange your workspace so you can move smoothly between tools without disrupting your workflow. Keeping a roll of paper towel handy for quick clean-ups and wiping your brush on is also a good idea.
Consider the Environment: Acrylics dry faster in warm, dry conditions. If you prefer a slower drying time, especially for blending, consider using a fine mist spray bottle to keep your palette and painting surface slightly damp. Alternatively, you can use a retarder medium to extend the drying time of your acrylics.
Start with a Sketch: If your painting involves specific shapes or composition, it’s helpful to do a light sketch on the canvas with a watercolour pencil before you start applying paint. This sketch acts as a guide and prevents you from having to rework areas if your layout doesn’t go as planned.
By setting up your surface and workspace thoughtfully, you’ll be better prepared to focus on the painting itself.
9. Just Keep Going
One of the keys to successful acrylic painting is understanding that the finished look develops gradually. Acrylics want to be built up in layers, allowing you to add depth and richness over time.
Layer for Depth: Acrylics dry quickly, which means you can add layer upon layer without waiting too long. Start by blocking in your painting’s main colours and values (light, medium, and dark areas). These base layers may look patchy or streaky at first — don’t worry, this is a normal part of the process. As you add more layers, the colours will even out, and your painting will take on a smoother, more polished appearance.
Focus on Values First: Before worrying about precise colours, get the tonal values right. Use a larger brush than usual to block in dark, medium, and light areas. Values are what give a painting its sense of depth and form, so it’s crucial to get them correct early on. To check your values, take a photo of your painting, convert it to black and white, and compare it to a black and white reference image. Any discrepancies in value will stand out, helping you make adjustments before adding finer details.
Save Details for Last: Small details and highlights should be the final touches in your painting. These fine details add depth and interest but can distract you if added too soon. Think of them as the “cherry on top” – You bake and ice the cake before adding the decorations. Waiting until the final stages to add details also ensures that they aren’t unintentionally covered by other layers.
Trust Yourself and the Process: All paintings have a stage where they look unfinished or rough. I call this the “ugly stage”. Don’t be discouraged; remember that this is part of creating something layered and rich. Acrylics allow for easy corrections. If a colour or section isn’t working, let it dry and paint over it. With each layer, your painting will improve, and any “mistakes” can usually be painted over.
By building layers and taking it step-by-step, you’ll develop a painting that feels cohesive and complete. Trust the process, be patient, and keep going even when things look messy.
10. Learning from Books, Classes, and Communities
No matter how much you practise, there’s always more to learn, and getting help from reliable resources can accelerate your progress. Luckily, there are countless ways to improve your acrylic painting skills, from books and online classes to art communities.
Books for Beginners: Many books are tailored specifically for beginner acrylic painters, covering everything from basic techniques to creative projects. Look for books that focus on fundamental skills, with step-by-step guides and clear visuals. Once you’re more confident, you can branch out into books that focus on specific subjects, styles, or advanced techniques.
Online Courses and Video Tutorials: On the site we have heaps of beginner-friendly acrylic painting classes & courses. These are perfect for visual learners, as you can see techniques demonstrated in real-time. To stay motivated, start with the beginner classes and courses then gradually work your way up to more advanced material.
In-Person Classes and Workshops: Many art centres, community colleges, and local studios offer beginner acrylic painting courses. Working in a group setting can also introduce you to fellow painters and provide a supportive environment where you can share ideas and learn from each other.
Join Art Communities: We have our own community forum right here on the site for members. Art communities are invaluable for connecting with other artists and getting feedback. The forum also provides a place to get inspiration, ask & answer questions, and encourage you along the way.
Challenge Yourself to Keep Growing: As you gain confidence, start exploring more advanced resources that push you outside your comfort zone. Challenge yourself by trying a new technique, experimenting with unfamiliar subjects, or following along with a more advanced tutorial. Regularly pushing yourself will help keep your skills evolving and prevent your painting practice from becoming stagnant.
Painting is a journey, and learning from experienced artists, structured resources, and supportive communities can make it both enjoyable and rewarding. By reaching out for guidance and inspiration, you’ll gain skills faster and enrich your artistic experience.
Final Thoughts
Getting started with acrylics might seem overwhelming, but remember that every artist was once a beginner. Take things one step at a time — selecting the right materials, experimenting with colour, and trusting the process. Mistakes are part of the learning experience, so don’t shy away from them. Embrace the journey, find inspiration, and keep pushing yourself creatively. With practice, patience and a little help, acrylics can become a wonderfully expressive hobby. Enjoy the painting process!
If you enjoyed this tutorial, you will also enjoy the one on 5 Ways to Improve Your Paintings Without Really Trying, go check it out!
Pin Me
