So you’ve found a great reference you can’t wait to paint or you’re inspired by a scene in nature? The fist stumbling block for most new artists is the belief “but I can’t draw”. In this tutorial we will look at some drawing tips for painters that will get you painting sooner.
We will concentrate on methods you can use to get your reference accurately and quickly drawn onto the canvas.
Most people are intimidated by the idea of drawing and believe it is a skill that they should have learned in childhood but somehow never did.
The truth is that anybody who is motivated can be taught to draw. There is no mysterious “ability” that the lucky few are born with. As a painter you do not need to become a master of drawing, much in the same way as learning to write doesn’t require you to become an award winning author. All you need is to gain the competency to transfer the subject of your painting onto the painting surface with an acceptable degree of accuracy.
The first tip is as ancient as the pyramids:
Grid Method

You could use the grid method whereby the reference is divided into small equal blocks and the painting surface is divided into the same number of blocks. The contents each block on the reference is then carefully copied into the corresponding block in the canvas. Originally used by the ancient Egyptians this method can be used to change the size of the reference so you can paint on a larger or smaller canvas using this method.
This is an accurate method and does improve observation skills and hand-eye coordination but it’s too tedious for simplistic artworks. Using the grid is best used on complex artworks that require a high degree of accuracy. Examples of these are portraits and buildings. The grid method is also difficult to use when painting away from the studio.
If you would like to learn how to use the grid you can follow our Grid Drawing Tutorial.
Tracing
There are many methods you can use to trace your reference onto the canvas. By far the most popular are:
- projector
- camera obscura
- tiled printed pages (print your reference to the size of the canvas over several pages. You then tile the pages together to form a large photo)
Many amateur as well as professional artists use these techniques to transfer their reference to the canvas. Amateurs use it because it removes the need to be able to draw when they are still struggling to get a handle on the painting side of things. Professionals use these methods to save themselves time and ensure accuracy of the transfer, especially when doing commissioned paintings.
The advantage of tracing is speed and accuracy.
The draw back for the new artist is that there is no progress in learning the skill of drawing onto the canvas. Tracing is also only really an option when working in the studio, leaving you stranded when painting outdoors or away from the studio.
Freehand
The next method and the one on which most of these tips are based is freehand sketching.
Freehand sketching is an acquired skill which anybody can learn. It does however take time because in order to master freehand sketching you need to learn several skills:
- Observation
You need to observe your subject correctly and draw that as opposed to drawing what your memory tells you it sees because more often than not your memory is not very accurate. - Judgement
You need to be able to judge sizes, distance, angles, dimensions and proportions correctly which takes a lot of practice. - Eye Hand Co-ordination
After you have observed and judged what you want to draw, you need to actually draw it. When you first start sketching what your eye sees and what your hand draws can be vastly different as you have not learned the skills to translate what your eye sees into hand movements.
Tip - Replicate the Canvas
When you are still new at sketching freehand you find that you make lots of mistakes that need to be erased. To ensure your canvas doesn't end up a dirty mess even before you have started painting, it is better to draw onto clean tiled pages.
As with the tiled pages method mentioned and shown above, you can use clean sheets of paper to replicate the size of your canvas.
To do this lay sheets of paper onto your canvas so that the touch the outer edge of the canvas. Let the sheets slightly overlap each other. Use sticky tape to stick them together. Now lay more sheets down to fill in the central exposed canvas. Stick them all together.
You can now turn the tiled paper around so that you have perfect replica of your canvas to draw on. You can now scratch, draw and erase as much as you want.
When you are happy with your drawing, you can place the paper onto the canvas, then trace your outlines using carbon paper.
By learning to draw not only will you be able to draw the outline of any reference you may want to paint, but also and even more importantly, you will learn about values, line and form without the additional complicating factor of colour.
Lessons learnt in drawing apply to any and all other art forms. When you learn to draw you will be able to apply these principles to create 3D images on a 2D surface which painting involves.
What follows is a collection of shortcuts you can use either singly or together to improve your drawing skills. The more your practice drawing the better you’ll become as you “get your eye in”. Soon you won’t remember why you ever found drawing scary.
The first challenge when drawing onto the canvas is to ensure that the image you are drawing will fit into the space you have allowed on your painting surface. It’s infuriating to nearly finish a drawing and find that your image won’t fit on the painting surface and you have to start over.
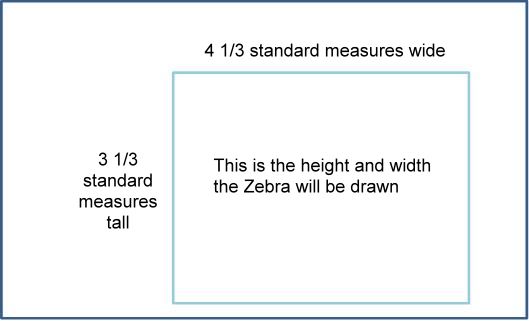
Using Standard Measures
To prevent this pitfall, study your reference and choose a standard measure.
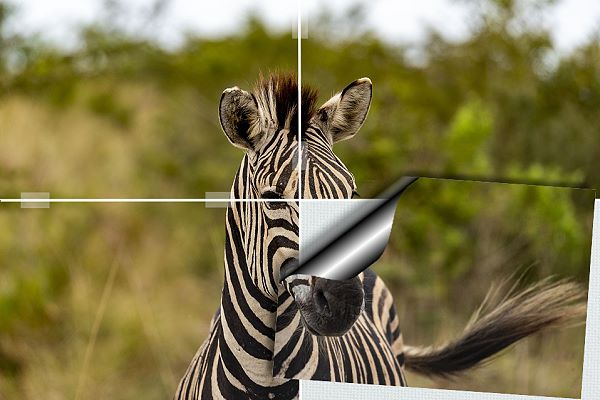
(If you would like to try your hand at these exercises, then click the button below to download the image of the zebra)
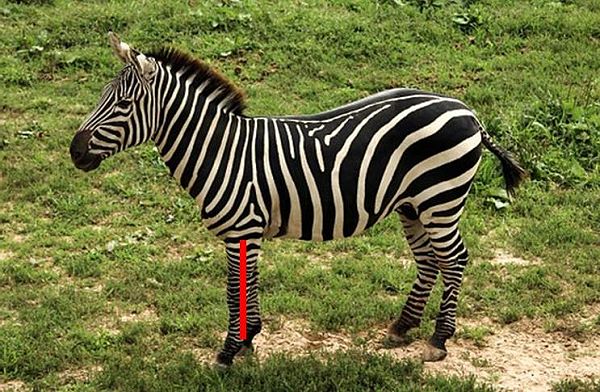
This can be anything in your reference, but make sure it’s not too long or too short.
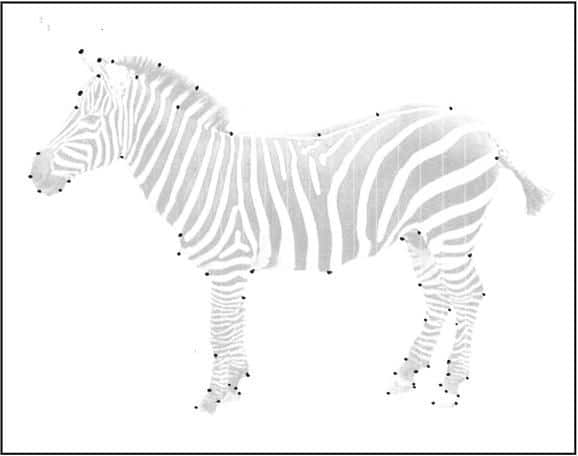
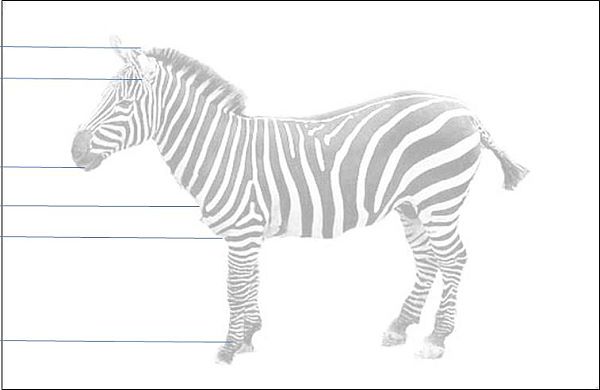
In the above photo the length of the zebra’s front leg from elbow to fetlock is the standard measure chosen.
In the photo above a few of these standard measures have been marked so you can see how it is used to measure all the other features of the subject, in this case the zebra.
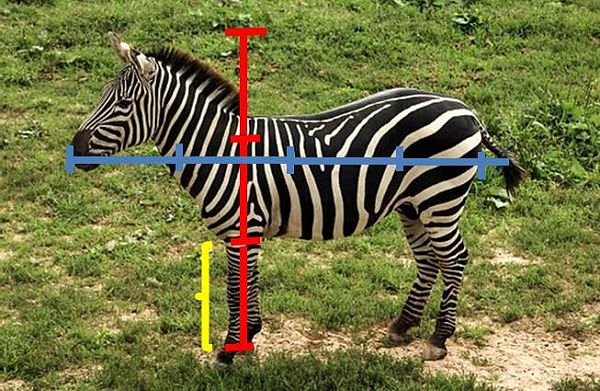
Start off by deciding how high and how wide your zebra must be. Mark the top of the zebra on the canvas.
It’s now easy to gauge that the total height of the zebra from the top of his ears to the bottom of his foot (hoof) is about three of these standard measures plus about 1/3.
Now you can draw a vertical line on your painting surface the height you want your finished zebra to be from top to bottom.
To find out how wide the zebra must be, use this same standard measure and calculate how many fit into the widest part of the zebra. In the example above it would be 4 and 1/3. Now you know the height and width of your zebra draw a frame very lightly on your painting surface where you want your zebra drawing to be.
The standard measurement method can be used in exactly the same way no matter what the subject of your drawing.
Now that you know how high and how wide your zebra must be you now need to draw it to fit into the frame.
You will continue to use the standard measure to measure the proportions of the zebra.
Using Intersection Points
It’s always difficult to know where to start drawing so having this frame helps.
Start drawing at a point where the object intersects the frame.
What I do is see how far down or across the interesting point is in relation to the frame. For example, the nose of the zebra intersects at roughly 1/3 of the way down the frame.
You then mark this intersection point 1/3 of the way down the box you drew onto your canvas.
Below I have marked possible starting points.
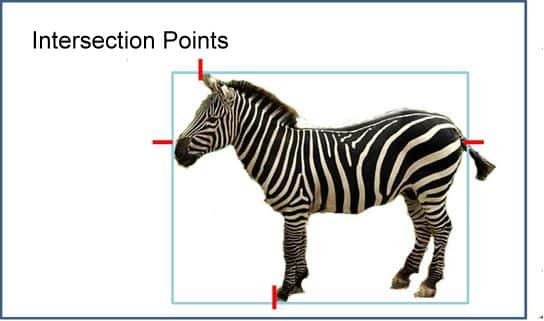
Plot as many intersecting points as you need in order to check their relationship to each other as that will help you with positioning later.
Once you are happy that the intersection points are at their correct places we can start drawing.
Using Negative Space
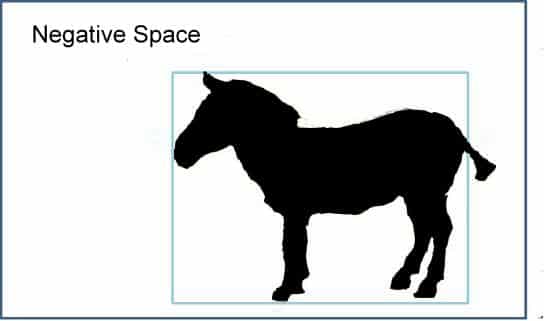
Now that you have a place to start, the easiest way to proceed is to study the negative space and draw that. Negative spaces are the spaces that surround the positive space; (in the example above, the Zebra is the positive space). Because you have drawn a frame enclosing these negative spaces they are easier to see and draw.
Because of the nature of landscapes, using negative space is not always useful as there often is less negative space. See the Cross Hair method below which often works better for landscapes.
When drawing negative space - whose abstract shapes doesn’t "make sense" to the logical left side of the brain - it’s less likely that it will interfere in the drawing process thus making it easier to draw what you see without the left brain’s stored images of zebras getting in the way of accurate seeing.
When you have carefully drawn the negative spaces the outline of the Zebra will appear as if by magic.
In other words don't draw the zebra, just draw the negative space. The zebra shape will automatically appear.
Cross Hair Method

When you have more experience, you may prefer to use a less structured approach to copy what you see onto your painting surface.
As always the question is where to start. What helps is to draw "cross hairs" on your image as well as on your painting surface. These cross hairs should ideally go through that area of your reference which contains most detail which is not always the centre. Cross hairs are then also drawn on the painting surface in the corresponding position.
Using this method (which is a very simplified grid), you have a starting point and intersection lines to assist in copying your drawing onto the painting surface.
Drawing is Relational
Drawing, although made up of lines, is not a linear process but a relational one.
Once some lines have been put down on your painting surface, comparisons are made to other lines and altered if necessary. It’s a back-and-forth process which is why it’s important to draw as lightly as possible. Once you are satisfied that your shape looks correct, you can firm up on the outline but not before.
Using Common Shapes
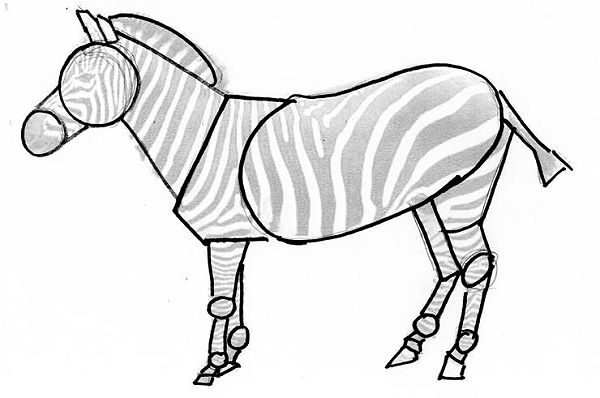
There are shapes we’re all familiar with – ovals, circles, triangles and squares. If you break down your reference into these shapes (they don’t have to be exact), it makes it easier to judge the relationship between the various parts and make sure they are in proportion to each other. This will result in a “skeleton” outline which can be refined to make your drawing more accurate.
Some artists prefer to use only ovals which are easy to draw. Different people will see different shapes in the same reference. As long as you can recognise and reproduce the shapes you see that’s all that matters.
At this basic stage of constructing your drawing it is easy to play around with the shapes until the “gestalt” or the collection of all the individual shapes makes sense and is in proportion.
Plotting Points
A strategy that works well if you are redrawing to the same size, or fixed multiples like 2x or 3x, is by marking points at strategic positions on the object you are wanting to transfer. You can see how I have done this in the image above.
Using a ruler or proportional divider you can then measure how far each dot is from the closest corner of the frame and mark them correspondingly on your drawing.
(Some people choose one corner, typically the bottom left corner, and measure all the dots from that "point of origin")
Once you have all your dots plotted on your canvas, you can "join the dots" to form the outline.
You can also use this method to find specific points within the object e.g. find the placement of the eyes, ears etc.
Draw using Straight Lines
It’s easier to draw a curve accurately in steps by drawing short straight, overlapping lines. These guide lines are drawn very lightly and erased once you are confident of the shape of the curve.
Checking Your Accuracy
Once you are satisfied with your “skeleton” drawing, it is time to start tweaking the detail.
How much detail you need will depend on the style of the painting you envision.
If it’s impressionistic then fine detail is not required. Realism on the other hand needs a precise drawing.
Measuring
Note: this page contains affiliate links to products on Amazon. If you purchase through the links I will earn a small commission for the sale at no extra cost to you.
Make sure that your drawing is accurate by measuring the distance between points.
You can do this using standard measurements as explained above, or to be even more accurate, you could use a ruler (if it is a site-size i.e., same size drawing as your reference).
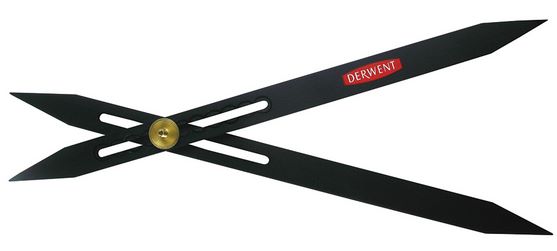
If not you could use a tool called a proportional divider which can be adjusted to allow scaling up or down of measurements.
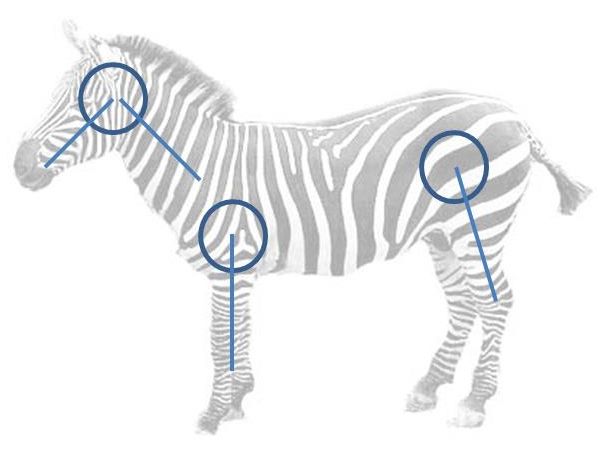
Plumb Lines
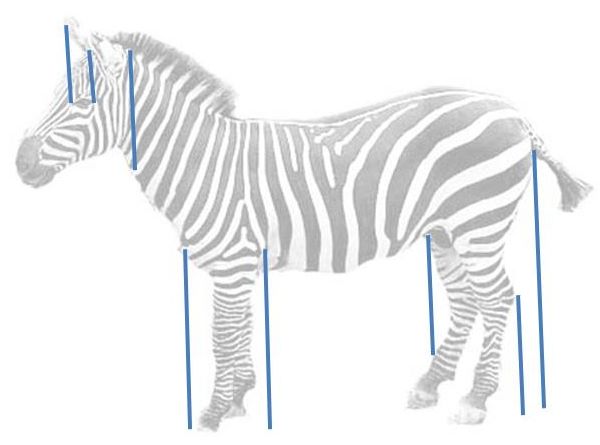
Draw straight lines (called plumb lines) from strategic points on both your reference and your drawing down to the frame to check the accuracy of the placement of the parts in your sketch.
You can see these plumb lines added to the photo above in the stomach area of the zebra. Now that these lines give you a mark on the frame, you can easier judge their distances from the edge of the frame in order to check their positioning.
Plumb lines can also be used to check relationships. If you look at the plumb lines drawn on the face of the zebra, you will notice that they do not connect with the frame.
In this case you compare the lengths of the lines with each other. For example the left hand line (eye to ear) is half the length of the right hand line. The central line is 1/3 of the length of the right hand line.
You can now check on your drawing to ensure you have the same relationship / proportion in the corresponding places.
Level Lines
Plumb lines can also be drawn horizontally (although they would then not be called plumb lines but level lines). These give you information as to distances between areas of your drawing on a horizontal plane.
As with plumb lines you can check them to the frame or as relationships to other objects.
Check Your Angles
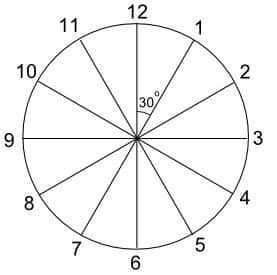
An easy and fairly accurate way of judging angles is to imagine a clock face.
You then decide at what "hour" the items is pointing in. For example the front legs are pointing towards 6 and the neck towards 10:30.
You check on your drawing to ensure you have the same "time" there.
An easy and fairly accurate way of judging angles is to imagine a clock face:
Talk to Yourself
Yes, I know that us artists are a little crazy and do it anyway, but you want to direct what you are talking about as your draw 😉
Ask yourself, "how does this line curve -is it inwards or outwards?", "at what angle does the head join the body?", etc.
By asking these questions, it forces you to look more closely at what you draw / have drawn and how it differs from what you see on the reference.
Important : While on the subject of talking to yourself - in the beginning, your angles, proportions, etc. ARE going to be off. It takes a lot of practice to get the eye hand co-ordination correct. Don't put yourself down when you get it wrong initially. Use it as a lesson to improve on next time.
Close One Eye
By closing one eye when looking at your reference (especially when drawing from life), you reduce a 3D image to a 2D image which makes the outline easier to draw as it removes the interference of the depth factor.
Values
Now that you have transferred the outline of your painting to your canvas you must create a 3D image using value.
Value means how light or dark an area is.
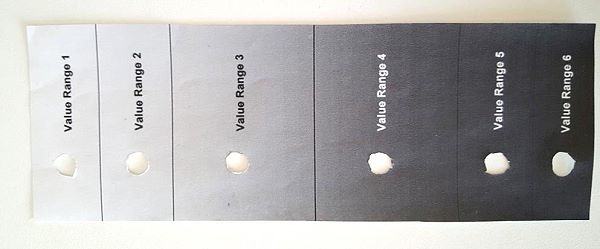
Value is judged by using a value scale. (You can print the value scale I use by clicking the button above.)
It’s very useful to punch a hole using a one-hole punch in each of the value blocks. This way you can move it over any area of your reference where you want to judge the value without any distracting surrounding colours getting in the way.
When working from a coloured reference, narrow your eyes and look at the value scale through your eyelashes. This “squinting” technique effectively reduces the influence of colour and makes it possible to judge a colour’s value on a grey scale.
An alternative to this is to convert your reference image to grayscale so you can easier check the values.
If you’re copying a monochrome (one colour) image judging value is relatively easy. It gets more complicated when different colours which have their own values are introduced. (Lemon yellow is a much higher value than cad yellow medium for example). This is why many artists paint a monochrome (one colour in a range of values), painting first to get the values correct and only then glaze colours over this base.
It’s useful when doing your initial drawing, to mark areas of high and low value on your drawing as a guide in placing values correctly when you start to paint. You could use dotted lines for high value areas and solid lines for low value areas.
Values are what give a drawing “form” and are a subject of study on their own but always remember these 3 guidelines:
- The less light falling on part of an object the darker it will be.
- The lightest light in a shadow area must always be darker than the darkest light in the lit area.
- Lookout for light reflected onto your subject from surrounding surfaces. If you ignore reflected light you will sacrifice the realism of your drawing.
Edges
Guidelines here are that when two planes are separate from each other there will be hard edge created. In art where the artist can manipulate reality, hard edges are often softened deliberately to merge less important parts of the subject into the background thus directing the eye of the viewer to the more important focal points.
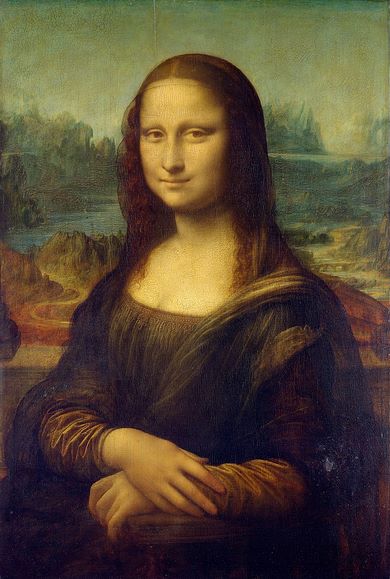
Notice how Leonardo Da Vinca used high value contrast between the face and hair as well as between the head and the background as well as between the hands and clothing as he wanted these to stand out as focal points.
Mark the Sun Direction
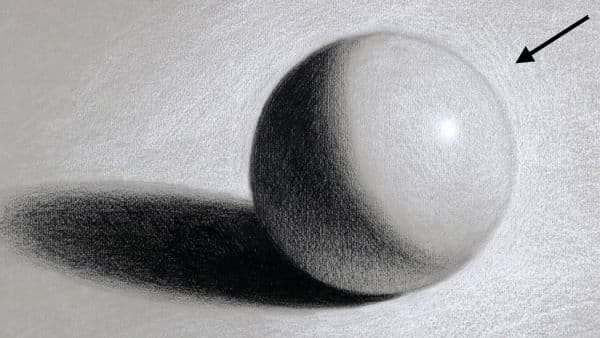
If you’re not using a reference at all but painting from imagination, you will have to decide in advance which direction the light is coming from.
Even when using a reference it’s useful to mark with an arrow the direction from which the light is coming to help you spot subtle shadows and reflected light which you can indicate on your canvas before starting to paint.
Conclusion
I hope you have enjoyed this tutorial on drawing for painters. If you would like to learn some more techniques as well as get some sketching practice you can follow my tutorial on How to Sketch Loose and Quick.
Pin Me