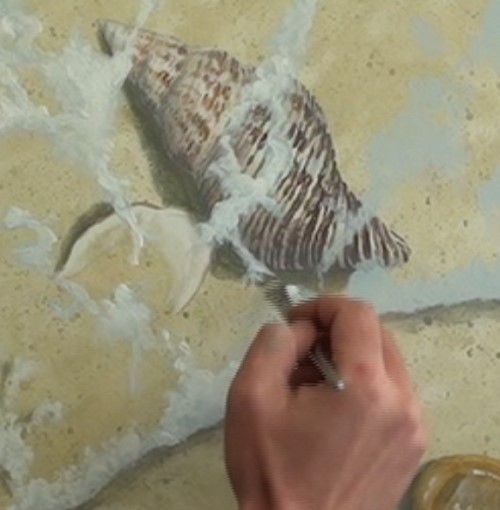
How to Paint Seashells on The Beach in Oil

Skill Level : 2 Intermediate, 3 Advanced
Medium : Oil Painting
Subject : Seascapes
Tutor : Nolan Clark
Class Length : 1 hour 55 minutes
Avg Rating : 
Silver Level or Higher Class
Class Description
In this lessons we are going to paint some beautiful seashells lying on the beach with a wave swishing over it.
We will learn :
1) How to paint seashells
2) How to paint the surf lapping at the beach
3) How to render seasand close up
4) How to paint wet and dry sand
5) and more...
Latest Reviews
No Reviews Yet

Class Tutorial
Planning

Transfer your sketch to the canvas using whatever transfer technique you prefer. Using appropriate colours of watercolour pencils, sketch in the relevant features.
Cover the canvas with a product such as Clear Cover. Cut around the shells to protect them with a mask while you paint the splatter for sand.
Sand - Colour Mixing

First make the colour mixture for the dry sand.
Sand Painting

Using a hardware brush, scrub the sand onto the entire canvas, including the masked areas. Then tap the brush randomly over the entire canvas to hide the brush strokes.

Now add a bit darker colour and medium to make the paint rather runny, so that you can flick on the splatter. Note the technique Nolan uses for this.

Add several additional tones to the paint and continue making more ransom flicks onto the sand.
If you did not uncover the mask from the shells that were to contain sand, do that now and apply the sand as you did above.
Allow this all to dry thoroughly before proceeding to the next step.
Wet Sand

Add a darker tone to the original sand colour and paint in the wet sand area, then continue moving randomly across the canvas to create a mottled effect.
Shadows

Add a darker tone to the paint and create shadows for your shells (which are still in the masks). The shadows can be darkened later, if needed.
Secondary Shells

Remove the masks. Soften the lines around the sand in the shells.

Mix the colours you will need to paint the shells.

Use a small brush to block in the colour along the edge of the partial shell at the top of the painting. Add some darker tones to create a rounding effect. Follow with some lighter highlight tones to complete the rounding. Paint in the heightened area on the inside, right side, of the shell. Add the small light spot in the center just inside the shell.
Enjoying This Tutorial?

Move on to the smaller shell to the left bottom of the largest one. Begin painting in the areas to give the mottled effect. Use Nolan's technique in applying the paints to create the effect of the shell standing away from the sand. Add the shadow cast by the shell to the right. You may find a need to use a darker tone instead of the white to make the shell stand out against the sand. Refer to the reference photo to add other mottled areas.
Move on to the third shell and use the same techniques to paint it. Use the sea sand colour to create a shadow under the half-shell. The darker the shadow you use here, the deeper the looking-in effect you create.
Now paint the mottled effect at the top right of the shell. Then paint around the perimeter of the shell.
Create some shiny spots to simulate the wetness of the stone.
Bubbles

Create bubbles (similar to a waterdrop) where appropriate. Put the highlight in first, then shade from the opposite side in. Add reflections, such as the shell colour. Then add the sun spot. Adjust the inside shading if needed, to make the bubbles stand out.
Stones

Mix the six colours you will need for the stones. Place the correct colours in the right places, starting with the darks and working to the lighter tones. Blend the colours as they appear on the reference photo. Add the shadow cast by the shell to the right. Add any other details.
Continue on to the other stones using the same techniques.
Main Shell

Mix the four colours for the large shell. Begin adding in the splotches of colour (light to dark), being careful to follow the spiraled contour of the shell. Be sure to get the lines correct to create the bulging shape of the shell. Go back over the shell to be sure that you have all the correct markings. Allow the shell to dry before adding the shadings.
Main Shell Shadings

Mix the proper tone for the shadings. Note how the shadings look in gray scale.

Lightly paint the shading tone onto the dry shell as demonstrated. Be sure to leave the top center of the shell clean as it will be the brightest spot.
Refine the shadow under the shells if needed.
Wave

Be sure the painting is dry before you start the wave.
Mix the colours you will need. Paint in the shadow colour marking the water's edge, making it squiggly with no sharp edges.

To create the bubbles, lay down a shadow bubble colour. Dab on the rough edge of the wave. Move up the painting, flowing the foam as you go. Vary the strands of foam, even having some cascade over the shells.

Add shadows to the patches of foam, giving height to them. As the water gets deeper, make the shadow farther from the foam.
Next randomly squiggle lines of very light white paint to give the illusion of water movement.
Now make a liquidy shadow colour and create a very subtle mottled effect, similar to what you just did with the white.
Conclude with dabs of white paint highlights where appropriate.
Once the foam is dry, go over it again with a bright white as Nolan is doing. Use less white as you come closer to the water's edge.

Be sure the painting is dry, then mask off the water's edge shadow and the beach so that you can create the illusion of bubbles. Mask of the shells, too. Splatter more sand over the foam.
Finishing Up

Go back over the painting to be sure you have all the details correct.

You May Also Like |