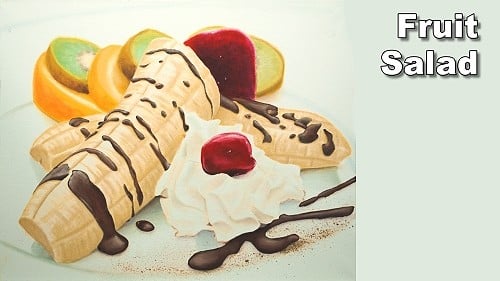
How to Paint Juicy Cherries in Oils

Skill Level : 1 Beginner

Medium : Oil Painting

Subject : Still Life

Tutor : Nolan Clark

Class Length : 1 hour 33 minutes

Avg Rating :

Gold Level or Higher Class

Class Description

In this class you will learn the techniques used to paint juicy glazed cherries.

You will learn what makes the fruit glow, glisten and beg to be eaten.

This technique can be used to paint other fruit as well like oranges, apples and strawberries.

Latest Reviews

Another moral booster class! Prefectly presented so that anyone can make a beautiful painting of very realistic juicy looking cherries.


Annie

Class Video

Class Tutorial

Theory

The secret to painting shiny, rounded fruits such as cherries and grapes is in knowing this two -step process:
Drawing its shape; and then
Adding the reflections.

Think about where to place your cherries on the canvas so that they will look most dramatic.  Combine both the “rule of thirds” and the need to create as much white space as possible, then draw the fruits onto the canvas.  Vary the position of the cherries, with some touching or overlapping.

Which colours to Mix

In preparing to mix the colours that you will need, take a close look at the underlying colours surrounding the reflections to see the variance of tones that are there.  Then mix a darker tone than you would normally use because the reflections will make what is around them look lighter.

Note that all cherries are not the same shade – some will have pinker hues; other have deep red hues.

Colour Mixing

Mix your colours using the method that Nolan demonstrates.

Masking the Background

To prevent any contamination on the white canvas during the painting of the cherries. Cover the area around the cherries with a product such as Clear Cover.  Cut out the cherry shapes with a craft knife. Leave the remaining mask to protect the canvas.

Painting the Basic Cherry

Determine the spot on the cherry that has the lightest value (highlighted area) and paint that in.  If doing multiple cherries, paint that spot on all of them to save time.  Wipe off the brush and apply a circular layer of the next darker value.  Continue using the same technique for even darker values.
Do the same on all the cherries.

Then, wipe off any excess paint from the brush and gently blend in the layers of colour.  Do not blend into the central highlight area.

Now move to the top area of the cherry.  To create the “looking-in” effect at the top of the cherry, apply the darkest color to the sides of where the stems will go and to any other areas at the top which may have bumps and indentations.  If there is not a large space between the indentation and the top of the cherry, just add the highlight.  If the space is fairly wide, add a mid-value between the two.

Begin to fill in the top of the cherry under the stem.  Add a light value under the dark indentation.  Gradually go darker until you meet the shadow colour at the side of the cherry.  Gently blend where the colours meet.  Be sure to add in those distinguishing bumps as you finish up the top of the cherry.

Use the same technique to finish the remaining cherries.  Add in any cast shadows where cherries are very close to or touching one another.

Painting the Reflections

Carefully study your reference photo or actual fruit to determine what light is reflecting off it and where those reflections are.  Before you begin putting in those reflections with white paint, watch how Nolan loads his brush with paint.  Now begin applying the paint in all the areas of reflected light.  Some spots may be quite faded and others more intense (such as the reflection from the sun or bright light).  Be sure your reflections are painted along the direction lines of the cherry.

Painting the Stems

Remove any Clear Coat that may still be on the canvas.  Mix the shades you will need for the stem colour.  Using the mid-value, try to pull on the paint to the entire stem in one stroke.  Then apply the dark value in patches along the dark side and do the same with the highlight value on the opposite side.  Darken the tops of the stems.  Add some white paint to create the rough edges at the very top.

Creating the Shadow

Mix the three primary colours as Nolan does to create the blackish shadow colour that will appear under the cherries.  Listen to Nolan's explanation of how the shadow will appear before you begin to paint it.  Start at the very darkest spot at the bottom, then gradually lighten and soften as you move away from the cherry.  It's best to start with a light shadow, then go darker as needed.  Be sure the shadow is at its darkest along the edge of the cherry.  Use the same technique for the remaining shadows.

Final Cherry Painting

Go back over the painting to be sure you have all the details correct.

Nolan

About Nolan Clark


Read more about Nolan Clark

You May Also Like

Follow Us on :