Short Class Video
Class Tutorial
Drawing the background

I start by plotting out the positions of the basic features using a cloth dipped in graphite powder.
As this draws light and has no hard edges it allows me to reposition and move the features around until I am happy with their placement.
While I have the cloth in hand I also shade in the subtle contrasts in the cloudy sky.
Defining the edges of each feature

I then use my pen shaped eraser to start defining the edges of each feature. At this stage I am basically drawing in reverse.
What I am looking for are edges.
Where does one row of trees start and another end? Where is the water’s edge? Where is the tree in the foreground, and so on…
Drawing the trees in the background

We can now start drawing the forest in the background.
As I am right handed I will start on the left and gradually make my way towards the right. That way I am working over empty paper so cannot accidentally smudge the drawing.
If you are left handed then I recommend working from right to left.
The trees at the back are very dark so I start off with a 6B pencil.
I establish the silhouette of the tree line first as that is the easiest place to start.
I then gradually fill up the tree mass using a scribbling motion.
I can’t just colour in the area despite it being very dark. If we do that it would look flat. Using the scribbling motion adds the texture we need to create the illusion of a mass of trees.
As I build up the mass I gradually press harder and harder to create the impression of tree tops inside the mass.
If you look carefully you will see that I am loosely using the lighter and darker areas on the reference photo to guide me where to go darker.
I am however not being pedantic about it. Nobody is ever going to notice that they are not the same because you won’t hang the photo next to the final artwork.
I’m now going to do exactly the same procedure for the rest of the forest.
As I move along I’m concentrating hard on getting the outer silhouette of the trees defined by making sure there is a contrast between the front and back trees.
I’m also concentrating hard to match the overall tonal value in each area as it is the different tonal values that defined the various tree masses.
Notice that as I work I keep my left hand pointing to the area on the reference photo that I am currently drawing.
This helps me not to get lost between the various tree masses.
It also helps me find my place in the drawing quickly.
I find that if you don’t do this your proportions and positioning on the drawing gradually becomes less and less accurate until you find yourself in a world of trouble.
You will also notice that when possible I will keep my reference photo parallel or aligned to the drawing. That way I only have to look left to right or up and down as opposed to diagonally. This helps a lot with judging your heights, widths and positions.
Drawing the basic impression of the water

For the water I first lay down a basic impression of the reflections using the graphite dipped cloth.
As before this allows me to roughly plot out where the abstract shapes in the water are as well as the basic positioning of the various tonal values.
Drawing the reeds

To draw the reeds along the waters edge I use a 4B chisel point pencil and a short, sharp vertical stabbing motion.
Drawing the reflections on the water

To draw the main body of water I once again use my pen shaped eraser to lift out the lighter areas.
From there I alternate between pencil and eraser to create the correct tonal values at the correct places on the surface of the water.
Notice I am working in mostly vertical strokes. These vertical stroke make our pencil marks look like reflections as opposed to the genuine item.
To really sink the reflections into the water, use your pen shaped eraser to lift out a few horizontal ripples on the water.
I am now pretty close to the tree trunk that is half submerged in the water so I roughly sketch in where I want it to go.
I then continue to lay in the reflections on to the lower part of the water.
Now I use a Q-tip or ear bud, as well as my fingers, to smudge the surface of the water.
The tonal values should roughly blend into each other. This makes the reflections appear even more out of focus which further separate them from the actual trees.
For the tree trunk I roughly scribble in its shape.
To suggest a bark effect I scribble along the length of the tree leaving some of the paper exposed.
Adding more character to the drawing

To add even more detail and character to the front of the drawing I add a few patches of grass and some smaller branches too.
For each of these I also add their reflections into the water.
As these reflections are close to us we won’t soften them like we did in the background.
We will however erase some horizontal ripples to separate them from the real item.
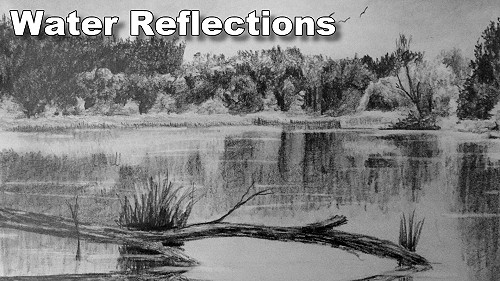
With that our landscape drawing is complete.
Final drawing

Click the button below to view the real time follow along version of this class:
Pin Me
