
How to Draw Aloes in Pastel
Skill Level : 1 Beginner
Medium : Pastel Painting
Subject : Flowers
Tutor : Dennis Clark
Class Length : 2 hours 13 minutes
Avg Rating : 
Silver Level or Higher Class
Class Description
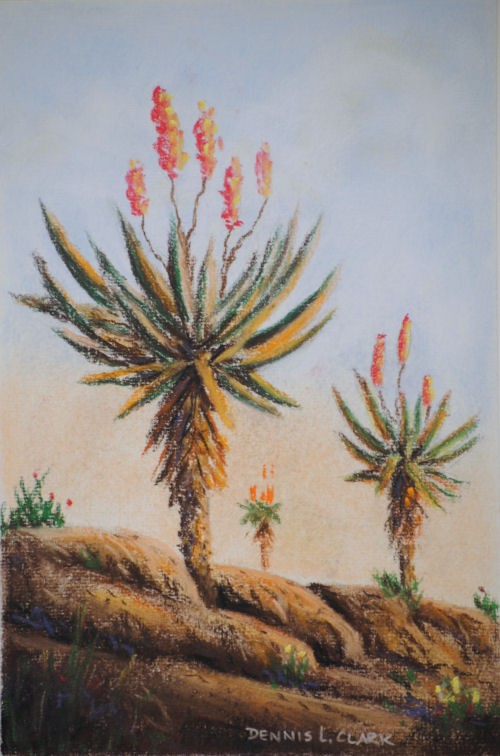
Aloes are very hardy when it comes to drought and harsh weather. It is a succulent plant and, as such, stores liquid in its leaves for survival. Most also have thorns and a very bitter taste for protection. Plant sizes range from very small to extremely tall. In this drawing you will be using only soft pastels.
In this lesson you will learn:
1. How to execute a smooth and gradient sky
2. How to draw the leaves and the flowers
3. How to indicate the rocky foreground
Latest Reviews


This class made me fall in love with Pastels.
Maryna


Class Video
Class Tutorial
Mats for pastel

Pastel paintings need to be framed behind glass for protection. Pastel paintings also need to be matted differently to watercolour paintings because of the possible “loose dust” problem. The above picture indicates a pair of corners. This is a view on the back of the double mats. Normally they are placed the other way around. Here it is deliberately reversed in order to show the “catching trough” to collect any loose dust that may fall during handling. This dust will fall out of sight and not on the front of the mat.
Painting the background (sky)

With a soft white pastel stick rub it all over the background. This help the blending when the next colour is used. After this, lay a light blue layer over this white dust. With tip of your finger, merge it evenly. Over this overlay a very light layer of yellow and blend softly.
Lower sky

A very light pinkish colour is now applied in the lower area of the sky to give the horizon a soft glow.
Painting the flowers

Paint the flowers using a bright red pastel stick. Do it in a dotted fashion to indicate the smaller flowers. As the light is coming from the right, spot in the bright side with cadmium yellow or similar. The reference photograph show three flowers. We will, however, add five of them.
Paint the stalks

With the edge of a light brown pastel stick, carefully “wiggle” in the stalks.
Paint the other aloe flowers

The other aloe flowers are painted in with the same colours as used in the main aloe. For the smaller, more distant, aloe use an orange colour instead of the red.
The main aloe leaves

Begin by painting in all the shadows with a dark brown colour.

With a yellow ochre stick, add in all the sunlit colour above the shadow lines. With a dark green, go over the shadow lines. This will produce a very dark green.
Paint the withered leaves

With a burnt sienna, paint the dried leaves, and then some yellow ochre on the sunlit side.
Enjoying This Tutorial?

Complete the other two aloes in a similar fashion.
Paint the embankment

With a dark brown lay in all the dark portions of the embankment. Then lay in the lighter areas with a yellow ochre, Naples yellow or similar and gently blend.
Painting the texture

Carefully start drawing in the dark shadows as well as all the small cracks, etc. with the edge of the stick. It is not necessary to copy all the markings exactly. Just try to get it more or less similar. With a lighter colour also add the minor highlights to add a little bit of sparkle.

Add in a few grasses for interest to make it look more natural.
Touch up the aloes

Touch up the aloes and add the dark centres, and some highlights as well.

Also paint in a few tall grasses at the base of the embankment, and some on the side.

Blend in the leaf area as a final action.
Final painting


You May Also Like |


