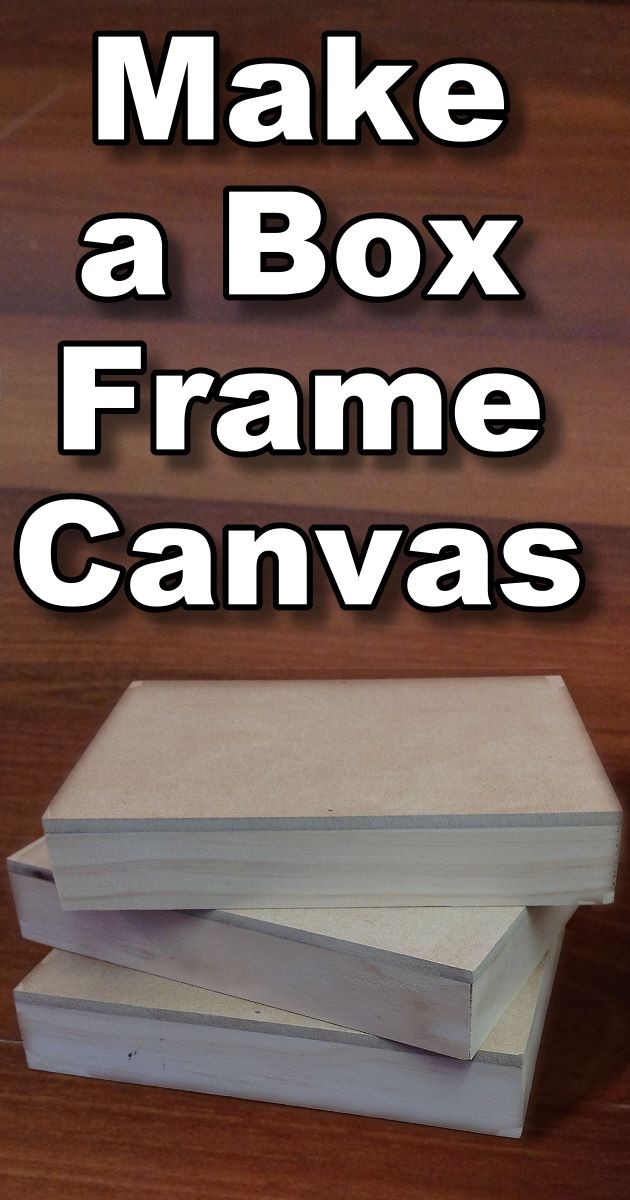
How to Make Box Framed Canvasses

There are several types of supports available to artists.
The ones mainly used are the flat canvas panels and the stretched canvasses.
The support that is not often used is the box framed canvas where, instead of canvas stretched over the frame, a solid wood panel is used in its place.
Box framed canvasses have a few advantages over the more traditional supports. Some of them are:
- There is no need for a conventional, expensive, frame. The deep sides, painted or unpainted, form their own frame ready to hang on the wall.
- Box framed canvasses can't be easily damaged during transit
- This support will not warp, stretch or bow
- You have a nice hard surface to work on
- They are great for mixed media artworks as you can even screw items into the canvas
Many artists live far from Art Suppliers and ordering can, at times, be very inconvenient. There is also the cost of postage which pushes up the price even further.
If you have the necessary tools at hand, then why not make your own canvasses?
Another advantage is that you can make them to any size you need. You are not bound by only the standard sizes available.
In this demonstration I will be constructing several small box frames ready for pasting small watercolour paintings on them. As mentioned previously, you may make them any size to suit your requirements.
Materials Needed
- Mitre saw. Either hand-operated or electric.
- Wood strips for the sides: 30mm x 10mm for small boxes or 40mm x 20mm for medium sized boxes. Larger boxes will require thicker strips.
- PVA Cold Glue
- Heavy duty stapler with 13x8mm staples for small boxes and 13x12mm for larger boxes.
- Electric sander or a wooden block with sand paper for hand sanding.
- Corner jig and two small G-Clamps (See photo further down for handmade option)
- Panel Pins and hammer
Optional: Logan Studio Joiner or similar.
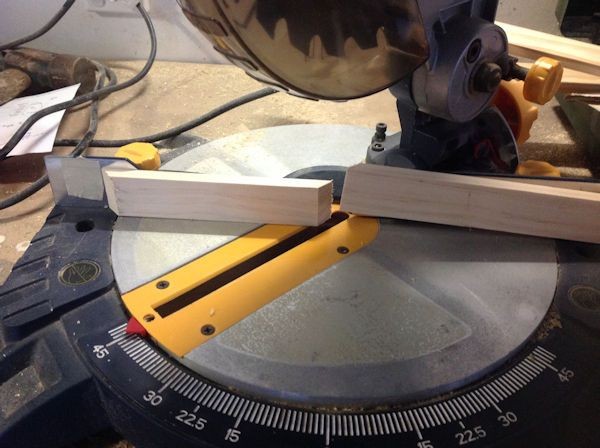
Making box frames requires a mitre saw. The one shown here is an electric mitre saw and is adequate for our purpose. In this case the saw blade has been set at 45 degrees to the left. Being right-handed it is easier for me to hold the small strips up against the wall while using the right hand to operate the saw. The normal blades give a slightly rough cut but we are not looking for the precision mitre cut required on a standard commercial frame. Our only requirement is that the outside corners must align completely, without any visible gaps.
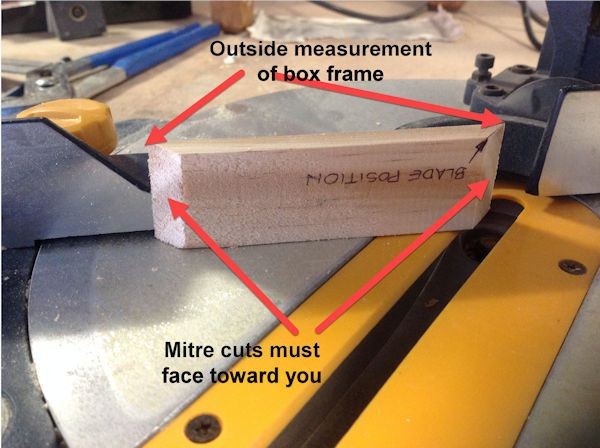
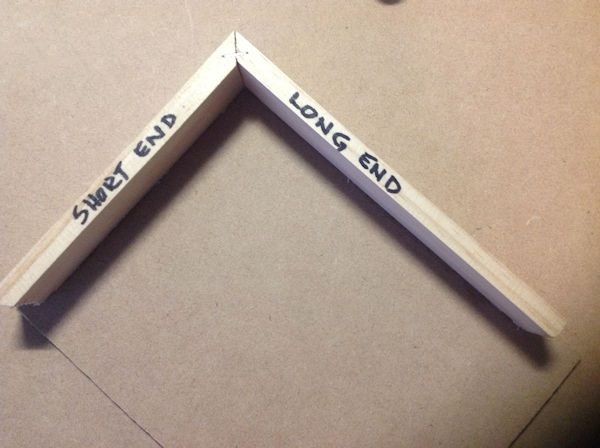
All outside measurements for the box are on the longest face of the cut strip.
Tip : Make sure the second bevel cut is on the same side as the first one. It is easy to get mixed up! After each cut, swing the length of wood 180 degrees with the same face towards you. The bevel side of the wood must ALWAYS face towards you as shown in the photograph.
Let's get started building our box framed canvas.
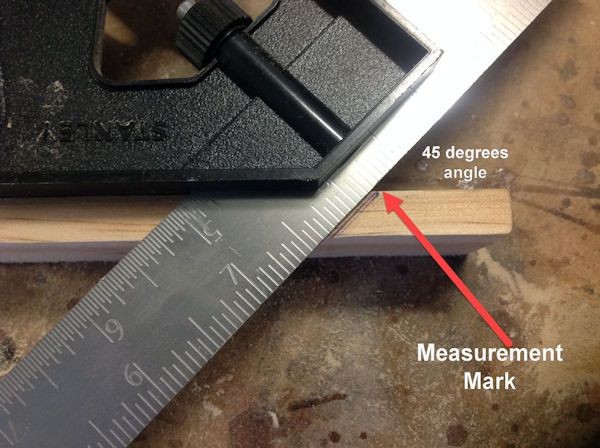
Adjust the square ruler to 45° and mark the first cut line near the end of the wood strip.
Place the length of wood onto the mitre saw ready for the first cut.
Electric Mitre Saw Method
The following photos show two setting types depending on whether the saw blade you are using has carbide tips or not.
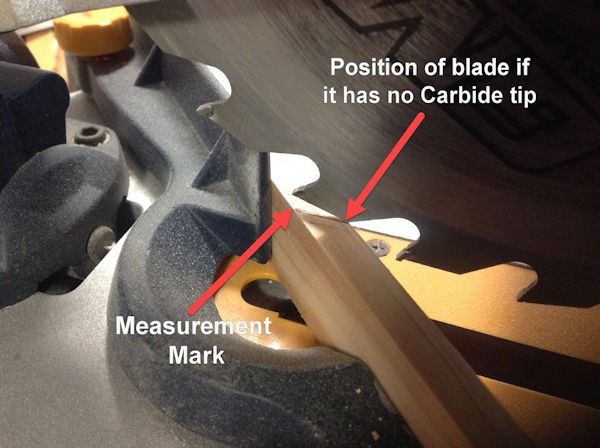
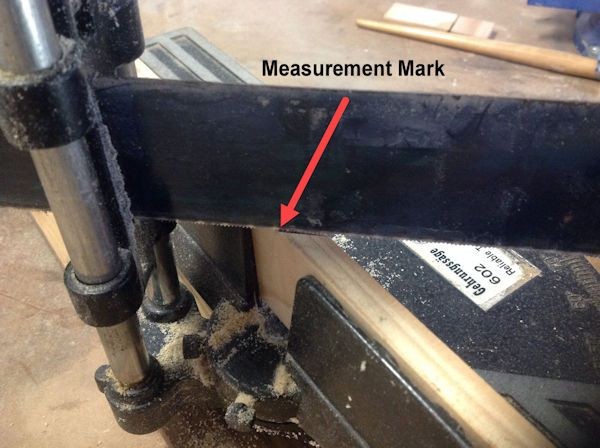
Blade measurement without Carbide tip
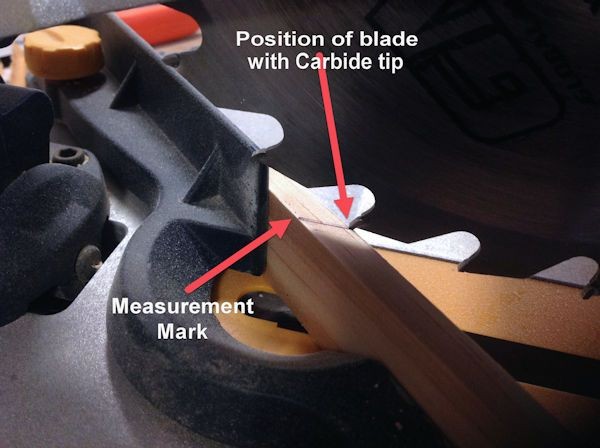
Blade measurement with Carbide tip
In this instance the tungsten carbide tip has a slight protrusion to be taken into consideration.
In either case the measurement mark shown is to the outside of the frame.
Warning: Switch the electricity off when setting up the first cut. The saw normally has safety features, but accidents do happen.
When making the cut bring the blade down in an even controlled motion, not in a chopping motion. A controlled motion will give you a cleaner cut and be less inclined to dig into the wood, ripping chunks out in the process.
Warning: When cutting with an electric saw always wear a dust mask, safety goggles and ear muffs. Ensure your fingers are well out of the way of the blade.
Hand Operated Mitre Saw Method
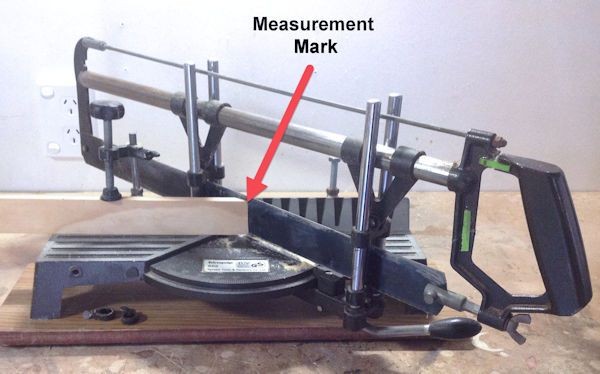
The safer option is to use this type of mitre saw which is hand-operated. This is set up for a right-handed person. Here the clamp holds the strip firmly in position. The saw handle will obviously be set at 45 degrees to the left if you are left-handed, as shown below.
For left-hand sawing notice that the bevel points towards you. When cutting right-handed the bevel will point away from you. You can see this in the two photos above. The top one is for right handed cutting, the bottom for left handed cutting.
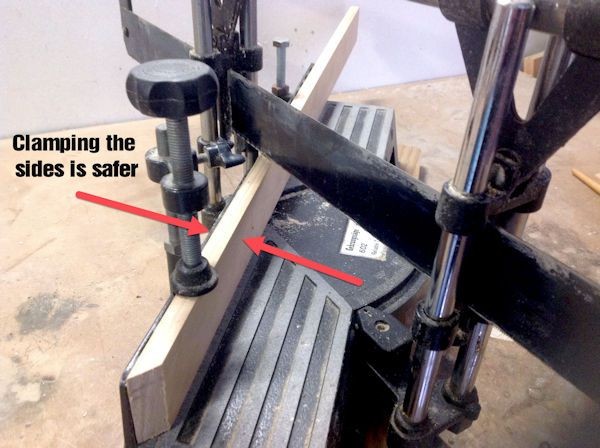
The wood strip in this instance is 40x10mm. Use a small G-Clamp if you do not have a top clamp to secure the wood (I have indicated when you would use the G-clamp with arrows in the image above).
For the first cut, ensure the total length of the wood is slightly longer than required as you will still need to mitre the opposite edge.
Always clamp the wood strip firmly in place before cutting.
Saw smoothly and methodically using a slight rocking motion.
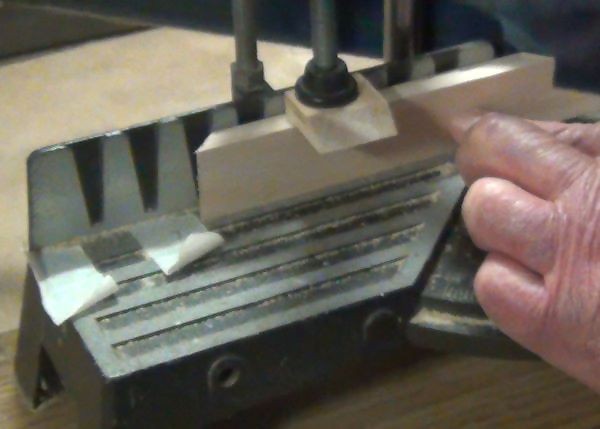
The photograph below shows the position of the wood when cutting right-handed.
Because the height of the wood strip is lower than the back wall I am using a spacer to be able to clamp it properly and safely.
Mark the length you need your side to be on the longest mitred face.
Swing the strip 180 degrees so that the mitred face is still pointing in the same direction (toward for left handed or away from you for right handed).
Place the blade on the mark and clamp the wood into place ready for cutting.
We will now mark this length on the base of the saw using masking tape. That way we do not need to measure every time, we can simply align the next length with the masking tape and be sure the two sides are the same length.
Stick masking tape down for a guide to cutting the short length.
Finish the second cut
You can now cut the second short length using the masking tape as a guide.
Repeat the cut, measure, mark, cut process for the two longer lengths.
(Look at the photo above to see how I have used the masking tape to mark the length of the wood for future cuts)
Hint: When cutting lengths longer than the edge of the mitre platform you are unable to use masking tape to mark the length. Instead, clamp the wood into place them create a stopper by placing a large heavy object against the end of the length. You can see how I do that in the photo below.
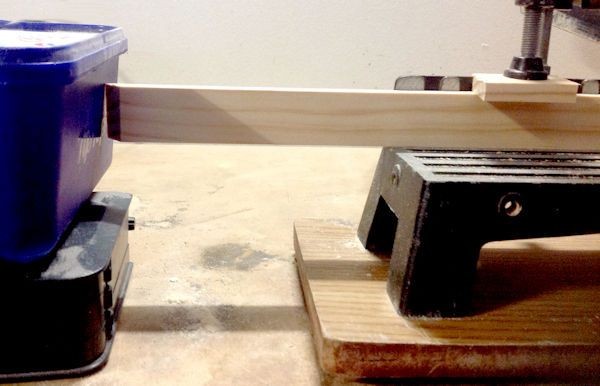
When cutting subsequent sides which are the same length, just gently slide the wood strip up against the heavy object, clamp, and then mitre the other end.
A plastic container filled with sand works very well as a stop if you are careful to not bump it out of place.
Tip: When making multiple box frames which are the same size, cut all the sides that are the same length for ALL the boxes before adjusting it for the next length.

Determine the length of the longest sides and cut them in the same manner
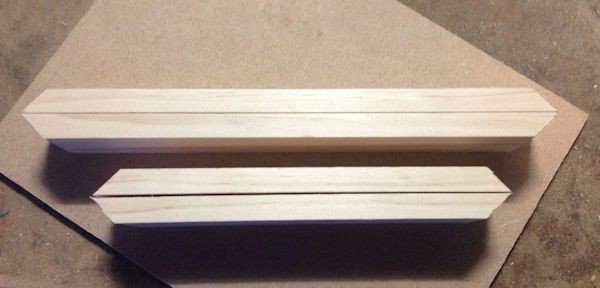
Test to see if the two opposite sides are exactly of the same length by placing them back to back as you can see above. If opposite sides are not the same length then you either need to trim the longer one shorter or cut a new length to replace the incorrect one.
If opposite sides are not the same length then your corners will not match correctly.
Joining the Corners
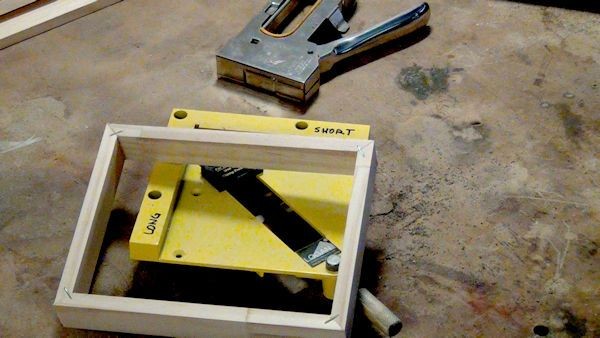
If you do not have a clamping jig here is a simple and cheap method for making your own.
Glue two wood strips to a small board. Use a square to make sure the two strips are at 90˚ to each other. You can staple the corner for extra strength. Leave to dry thoroughly before hammering panel pins to them from the underside.
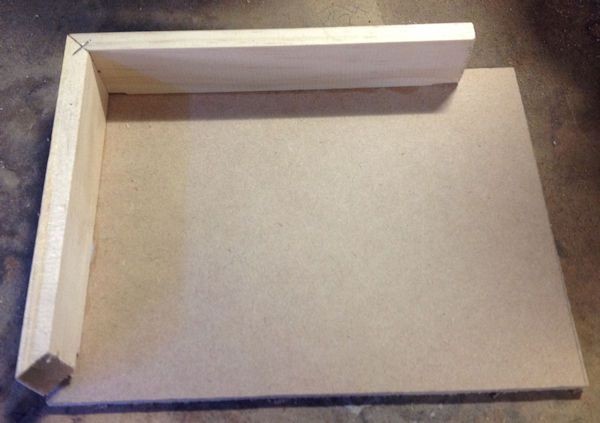
Here is another view of the jig from a different angle.
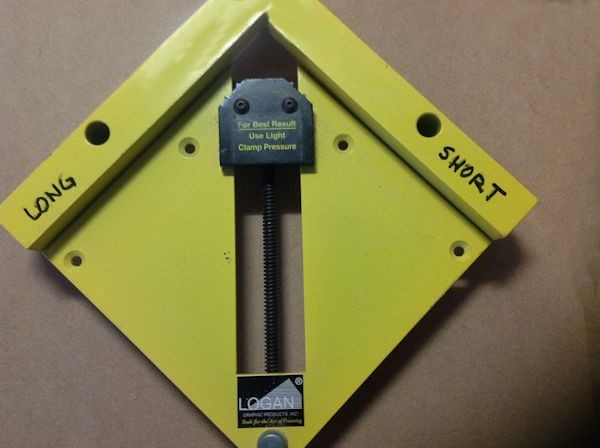
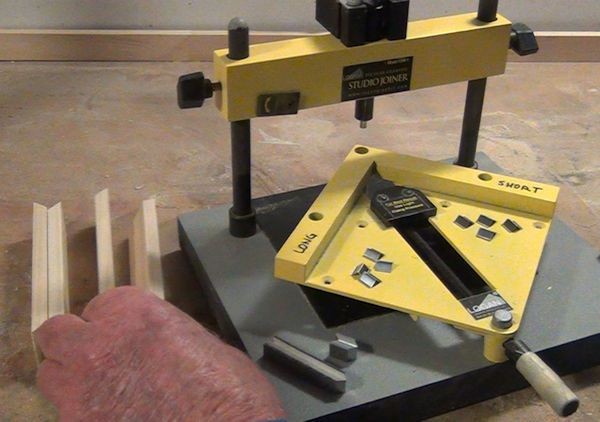
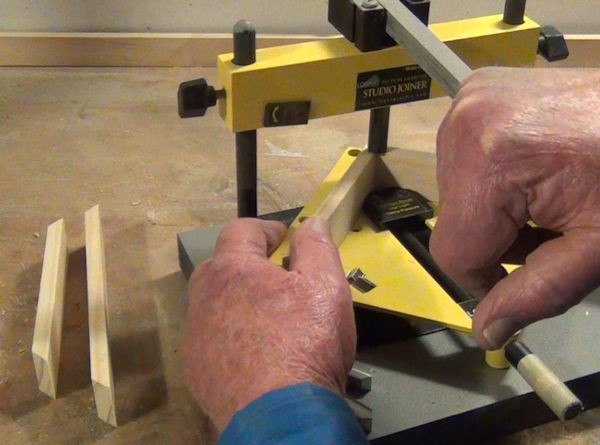
Here I have a professionally made clamp called the Logan Studio Joiner which I use for my normal framing of paintings.
Tip: So as not to accidentally join two lengths of the same size together notice how I have marked each side of the clamp.
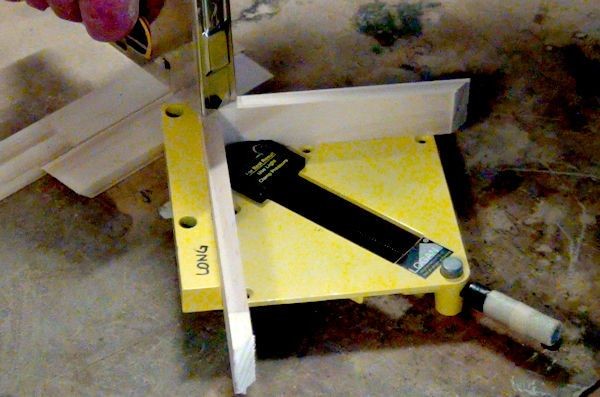
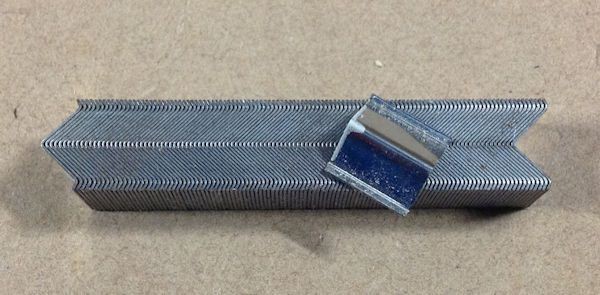
Take the two lengths, the short one and the long one and place them carefully in the corner and tighten up to grip them ready for joining the corner. In this example I am using a large stapler with 8 mm length spikes.
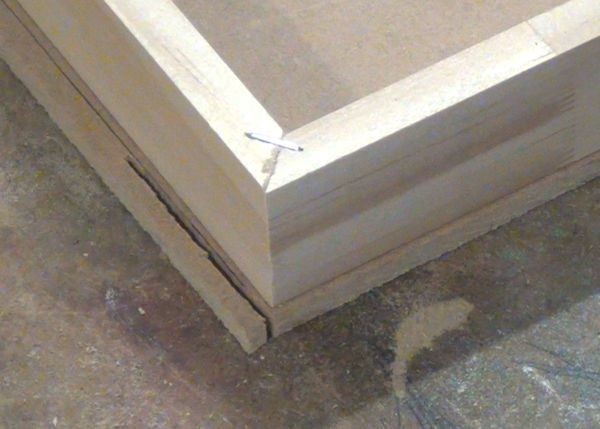
We now need to turn it around to add another staple. This will strengthen the corner. When using smaller boxes like we are making here, you don't need to glue the joints. However, if you're making larger boxes it is best to both glue and staple the corners.
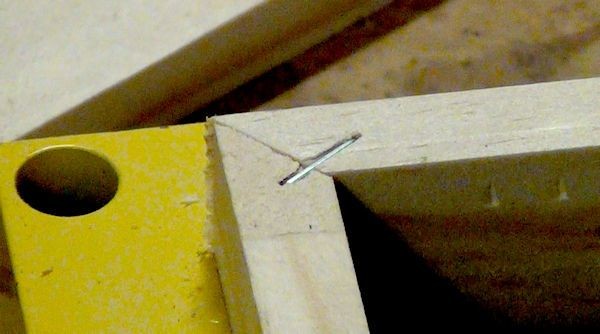
This close-up of the staple shows it nicely recessed into the wood. If the staple does not automatically recess itself, then gently hammer the staple using a flat screwdriver and hammer.
Continue joining the other corners making sure that you don't get mixed up between the long and the short lengths. If you don't concentrate it is easy to clamp two of the same lengths together by mistake.
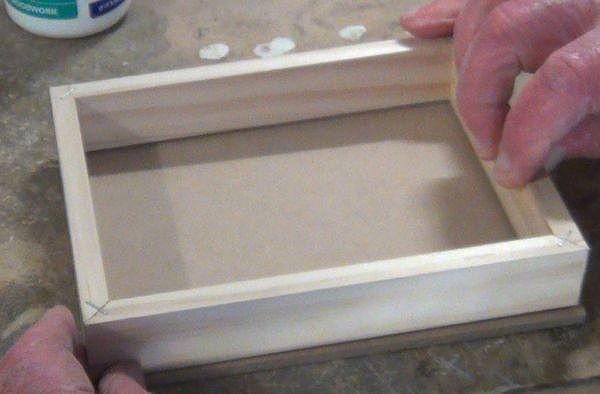
The completed frame pinned top and bottom.
Alternative Corner Joining Method
If you want to ensure perfect corners every time then I recommend you take a look at the Logan Studio Joiner. I have had mine now for many years and it not only works like a dream, it can also be used to make traditional frames.
This system uses commercial V-nails. All professional framers use these types of nails when framing as the V-nails create a very strong corner.
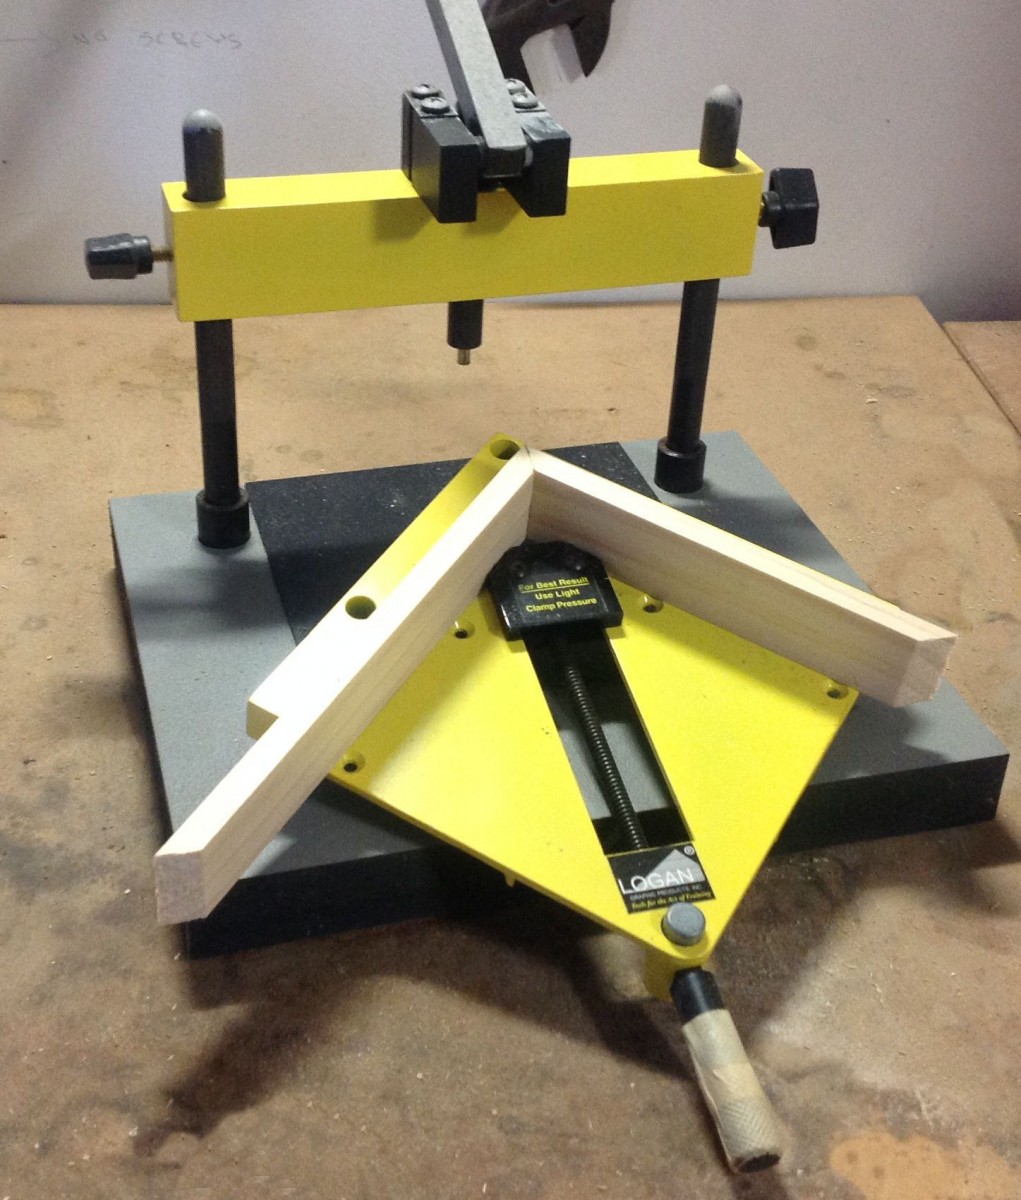
Clamp the box sides as demonstrated using the Logan Joiner Clamp.
Place the clamp on the Joiner Table and place a V-nail onto the magnetic plunger ensuring the cutting edge of the nail is facing downward.
Line the corner of the frame up with the corner of the V-nail.
Apply a steady pressure to the lever until the nail is completely driven into the frame.
Turn the Joiner Clamp over and drive a nail into the opposite side of the frame. You now have a perfectly joined and incredibly strong corner.
As before, if you are making a large box framed canvas, then you can also glue the frame at the same time to further strengthen the corner.
Here you can see how I am pressing down on the arm the drive the V-nail all the way into the wood.
With one corner complete you can repeat the process for the remaining three corners.
As a matter of interest, these V-nails are specially constructed with a slight taper to pull the frame ends together and hold them until the glue sets. The hooked sides prevent the joint from pulling apart.
The V-nails are glued together into a strip for insertion into the large commercial foot operated underpinning machines. With the Logan Studio Joiner you need to pull them apart and use them individually.
Attaching the Front Panel
We can now attach the pre-cut front panel to the frame.
The front panel is made of mdf (medium density fiberboard). For small canvasses I use 3mm thickness board. For larger canvasses I will use thicker mdf to ensure it remains sturdy and does not buckle.
When measuring and cutting the mdf to size I like to give myself a few millimeters extra on each side. That way I know I can sand the front panel to perfectly match the sides.
If you have cut the board a bit too large, then carefully cut away the excess as close to the box as possible. This saves a lot of sanding time. The board must however still have a slight overlap all around the frame.
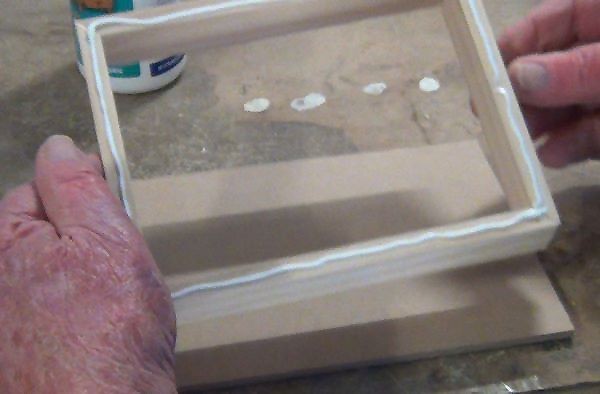
Make sure the staples are flush in the frame so as not to cause a gap between the board and the frame. If necessary, tap them with a hammer until they are flush. Apply a thin bead of PVA cold glue all around the edge of the frame.
Turn the frame around and a carefully place it over the board, checking you have an overlap all around the sides. When you are happy with your alignment you can gently press the frame onto the board.
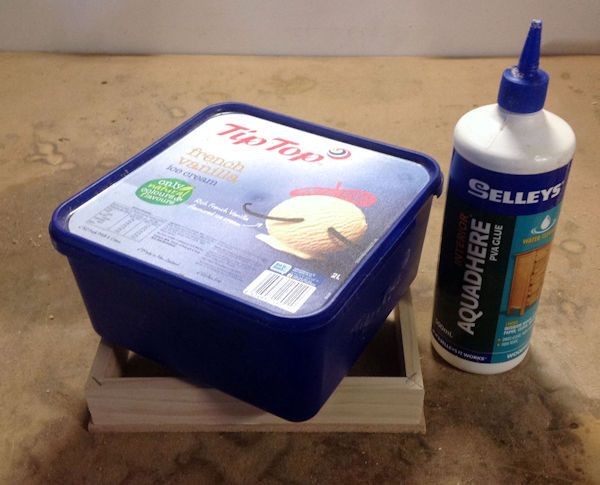
Recheck that you have an overlap on each side. Once you are satisfied, place a heavy object on top of the frame and leave it to dry completely.
I am using a 2L ice cream tub filled with sand as a weight. It does an excellent job.
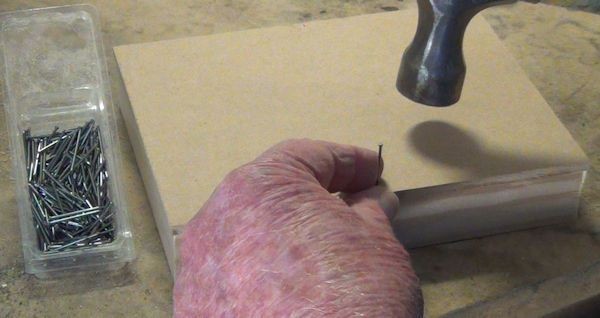
Once the glue has dried I like to drive in a few panel pins to the further strengthen the bond between the frame and the board. It is probably not required, but I prefer to be safe than sorry.
Important: Make sure that the panel pins are not driven in skew. You don't want them protruding out the side of the frame. This can easily happen if you are not careful when knocking them in.
You can drill pilot holes with a thin drill bit which is slightly thinner than the panel pins to ensure the pins go in straight and don't split the wooden frame if you are afraid of knocking your nails in skew.
Now that the box is fully assembled, it is ready for Finishing.
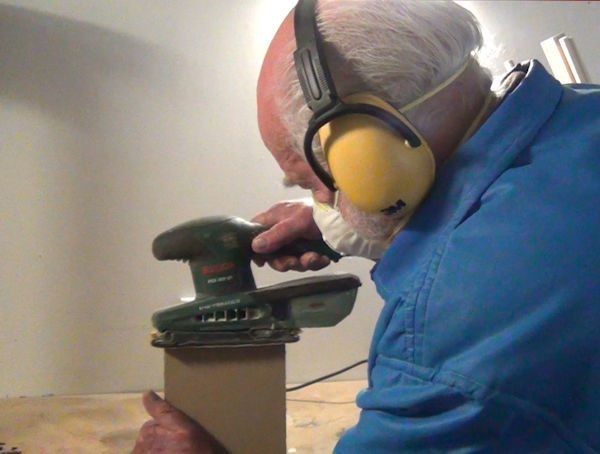
We need to sand the protruding edges so that they are absolutely flush with the sides of the box frame.
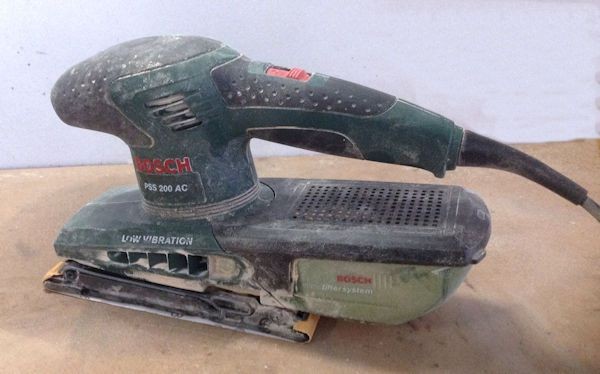
This is the electric sander I use.You can also use a sanding block. It just take longer to get rid of the ridge.
While you are sanding run your finger across the ridge to feel if more sanding is needed. Continue sanding until you cannot feel the ridge at all.

Warning: Don't forget the ear muffs and the dust mask while using the electric sander. Your health is more important than a box frame.
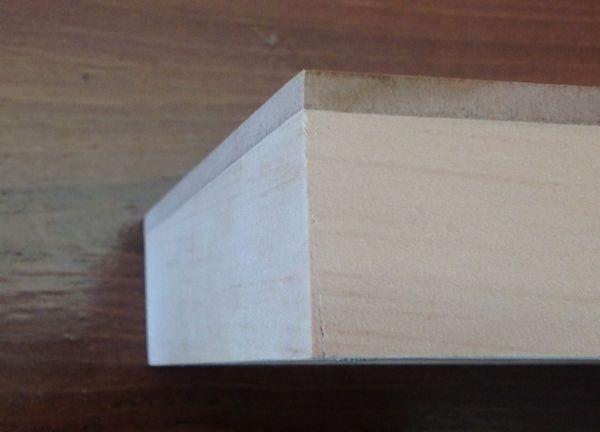
Here you can see what it looks like when the sides are perfectly flush and without gaps.
Fill in any gaps, however small they may be, with wood filler and leave to dry.
Sand them smooth again when the filler has dried.
Your box framed canvas is now complete.
From here you can paint onto it as is, gesso it or even use it to mount your watercolour artworks.
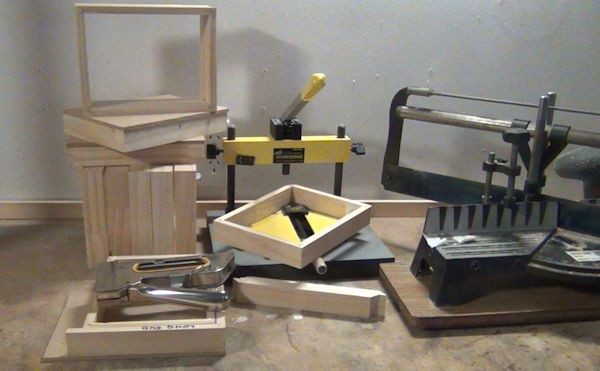
To round off this tutorial here is a glimpse of some finished and half-finished box frames.
Enjoy making your own box framed canvasses.
Be sure to check out my tutorial on how I mount watercolour paintings to these boxes as well.