
Watercolour with Pastel Pencils

Skill Level : 1 Beginner, 2 Intermediate
Medium : Watercolour Painting
Subject : Landscapes
Tutor : Dennis Clark
Class Length : 1 hour 7 minutes
Avg Rating : No Ratings Yet
Silver Level or Higher Class
Class Description
It does not matter where you live, but an early morning walk in the woods, or forest, is always a refreshing experience. No city noises, but only the quiet of nature, and the occasional twitter of birds as they flutter about in the branches.
In this Lesson you will learn:
1 How to take a mundane photograph and turn it into something colourful
2 How to add the watercolour underpainting
3 How leave out those objects that are not needed in the composition
4 How to use pastel pencils to add the details
5 And more ...
Latest Reviews
No Reviews Yet

Short Class Video
Class Tutorial
Initial Drawing

The drawing is just a few pencil lines for the main objects. This is on 140 lb or 300 gsm Watercolour paper.
Paint the Sky

Very roughly wash in the blue underpainting for the sky.
Ground Underpainting

Use Burnt Sienna to add a basic color to the ground.
Painting the Leaves

With Viridian and Orange make a darkish green mix and rough in the distant leaves of the trees, becoming lighter and more yellow lower down.

Drop in some darker green into this area. Do the same on the left side. Remember we are NOT painting any details with the watercolour, it is only an underpainting for the pastel. When done dry the area. Our distant leaves are complete.

Mix up a more vibrant green and use it to add the foreground leaves. Notice how roughly this is being painted. You can make the colours darker than expected as the colours lighten up again when they are dry.

Use a rough sea sponge to indicate individual leaves by dabbing it against the sky.
Painting the Tree Shadows

With a dark blue/grey mix made from Ultramarine and red, paint in the tree shadows across the path.
Painting the Tree Trunks

with a darker shadow mix rough in the tree trunks. Let the edges be a bit ragged to make them look natural. Add the smaller tree, and then the two trees on the right. You should be able to see the pencil lines beneath the watercolour layer.

With a damp brush, lift out the paint on the right side of the tree trunks for the highlights.

Use some Burnt Sienna to add colour to the trees.
Enjoying This Tutorial?
Painting the Foreground

Begin brushing in the texture in the foreground – darker in the closer foreground and getting lighter in the distance. Warm up the foreground by adding brighter Burnt Sienna or Orange to the mix.

With a light blue/purple mixture, add the lighter shadows caused by the trees outside the picture view.

Add some very light Orange to the path and to the sunlit areas of the trees. Thoroughly dry the painting as we are now finished with the underpainting.
Drawing the Foreground

With a black pastel pencil, lightly stroke the the side of it over the shadow areas as well as in the foreground. This begins to add texture to the ground surface.
Drawing the Trees

With a White pencil begin to draw in the highlights and the rough texture of the bark. See how the rough texture of the paper is working for you.

Draw in all the thin saplings and smaller tree trunks with the White pencil. Add in all the small branches and twigs.

When you have done that, use the black pencil for the branches and twigs in the shadow areas.
Proceed to do exactly the same for the trees on the left side of the path.

Add the small sapling with white against the tree trunk, and then black where it goes outside the trunk area.
Add the shadow to the sapling and for the main tree. The light source is from the right.

Add some darker marks on the main tree trunk. There are protrusions and places where branches have broken off.
Drawing External Tree Shadows

With a Purple pencil work over the previously painted shadow areas – darkening here and there to show interesting patterns on the ground. Add the shadows of the hidden trees as well. Add some interesting markings to the foreground.
Complete the Trees

With a pink pencil, warm up the sunlit areas on the tree trunks and branches where they catch the sunlight.

For interest, add some branches protruding in from the left. It helps to point the viewer's attention into the painting.
Complete the Path

Darken up some of the main shadows across the path and then the shadow markings on the edge of the path.
Add the Walking Figures

With an Orange pencil, start drawing in the shape of the main figure., and add in the head with a black pencil. Be very careful in not making the head too big. This is a very common mistake. The head is smaller than one realizes. Add the second smaller figure. Don't make them the same size.
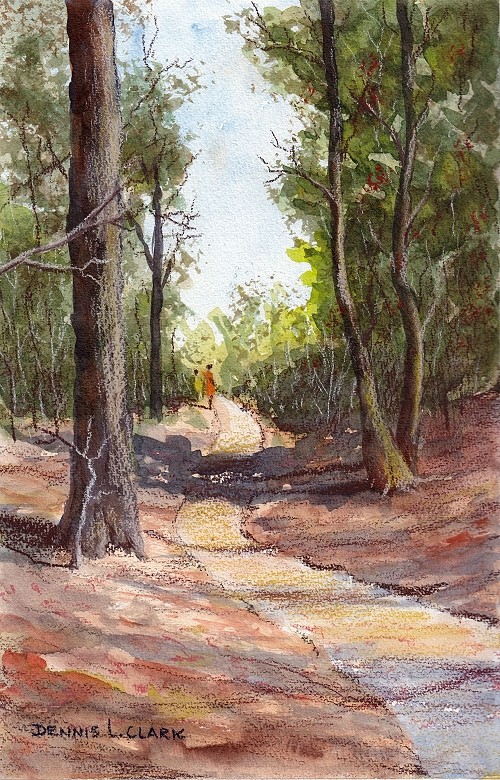
With that the artwork is complete. This is what it looks like:

You May Also Like |


