
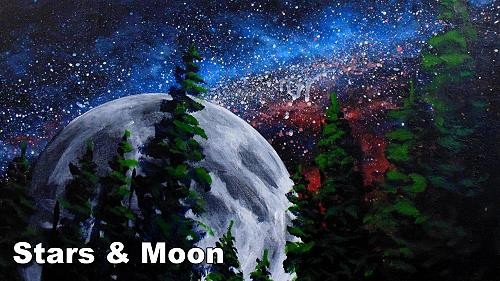
How to Paint the Stars and Moon in Acrylic

Skill Level : 1 Beginner, 2 Intermediate
Medium : Acrylic Painting
Subject : Landscapes
Tutor : Nolan Clark
Class Length : 1 hour 26 minutes
Avg Rating : 
Silver Level or Higher Class
Class Description
In this class we will paint the night sky.
During the class you will learn :
1) how to paint the stars and other galaxies
2) How to paint the moon and planets
3) How to paint trees lit by the night sky
4) and much more...
Latest Reviews


Thank you Nolan for this class, I viewed it and it is excellent with great techniques. It opens up my creativity. I made one painting of an (aurore boréal) and on to an other one. I will poste it soon. Thank you again Nolan for this great opportunity you have given me for the year.
Danielle
This video was just fascinating to watch. I did a milky way in watercolour and couldn\\’t figure out how to do it in acrylics! You answered my prayers lol. Thanks Nolan!
Maryline Nicolas

Short Class Video
Class Tutorial
Preparing for the painting

I am painting on a black canvas and have masked off the moon using clear cover, you can also mask it off using masking tape.
Although I am using a reference photo which you can see on the bottom right hand corner.
I am merely going to use it as inspiration for my night sky.
Paint the background

For the blue I am using Cerulean, and for the red I will use a mixture of Crimson and Orange.
Don't be shy to use completely other colors if you want to create a fantasy painting.
Creating the smokey effect

The colors we see create a smokey effect. To recreate that effect on the canvas I use a soft hair brush and tiny amounts of paint on the brush at a time.
I then apply the paint using little circular motions. I also only let the very tip of the brush touch the canvas while applying the lightest touch possible.
As you can see the paint then goes on very thin giving us the smokey transparent look that we need.
This also allows me to build up multiple layers to make the gas in the Milky Way look more or less dense.
You will also notice that I am painting the Milky Way at an interesting angle instead of horizontal.
Generally I add the first layer of paint broad and then a little narrower for each subsequent layer.
I also lighten the color by adding white in to the mix for the final layers.
This creates a glowing effect.
Enjoying This Tutorial?
Painting the stars
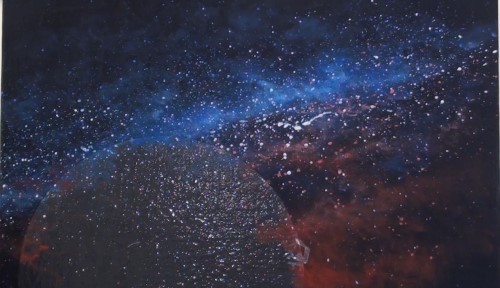
To paint the stars is extremely easy.
I use a hardware brush to splatter on the stars.
To get a good splatter you need to thin your paint down with water.
The more water you add the bigger the drops will be so I recommend that you so some test splatters on a piece of paper first to ensure you are happy with the dot sizes.
Add more stars along the length of the Milky Way and less towards the top and bottom.
Feel free to use several different colors too as that keep the sky vibrant.
I do however tend to use more white than the other colors though.
When doing splatter, always lay your canvas flat and then leave the paint to dry.
You can see how some of my splatter has run because my canvas was upright.
Painting the moon

Now lets move on to painting the moon.
I have added the moon in to our reference photo so you can get an idea of what it will look like.
I start by creating a mottled effect over the entire surface of the moon.
This will become the dark crater areas when we are done.
To create the effect I water down white paint to the consistency of an ink, I then randomly scrub this onto the moon.
I then use the hairdryer to dry this layer.
Once dry I repeat the process to enhance the effect.
Now we can start to paint the brighter areas and define the crater edges.
If you look at the photo you will see that there are very few even tonal values, everything is mottled.
For us to recreate this effect we will mark in layers.
Each layer a little brighter than the previous.
To ensure each layer becomes brighter I add some more white paint to the original watery mixture so that the paint become thicker and thicker with each layer.
As with the sky, you can see that I am only suggesting the shapes and craters using a rough and random scrubbing motion.
As I build up the layers I start to concerntrate on getting the moon to look round like a ball.
The moon is brighest in the 4 o'clock area and darkest around the 10 o'clock area.
To add the illusion of distance I add some trees to the foreground using black paint.
Painting the foreground

I add the trunk and then an impression of the branches and leaves with a zig-zag effect.
I then add a touch of green to them adding dimensions and stop them looking flat.
Notice however that the green is very low key to ensure the trees don't steal the attention away from the night sky.
Final painting


You May Also Like |


