
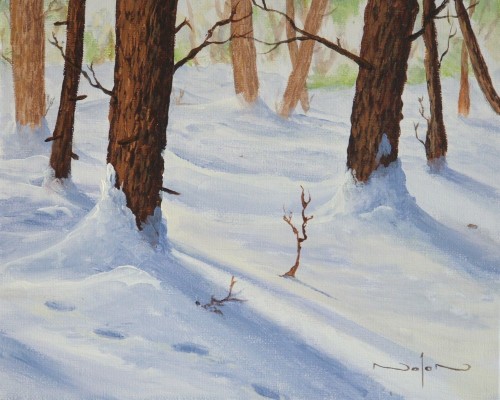
How to Paint Snow in Oil
Skill Level : 1 Beginner, 2 Intermediate
Medium : Oil Painting
Subject : Landscapes
Tutor : Nolan Clark
Class Length : 1 hour 59 minutes
Avg Rating : 
Gold Level or Higher Class
Class Description
There is something magical about watching the snow falling peacefully down to earth. You can hear the excitement in the kids voices as they rush outside to build the first snowman of the season. You watch as the landscape beyond gradually changes to a sparkling monotone wonderland and silently wish to yourself that you could capture this moment on canvas.
In this live class replay you will learn how to do just that as we will be painting snow this week.
Learn how to create depth in a monotone scene
How to capture the light sparking off the snow
How to paint footsteps in the snow
and much more
Latest Reviews


Thank you for another great class and for demystifying \"white\" snow.
Annie


Class Video
Class Tutorial
Planning

To create the WOW factor in a snow painting, use your artistic license to introduce some sunlight into the picture to make your scene come alive.
Draw the outlines of the basic shapes and contrasting lines onto the canvas. Watercolor pencils work well for this purpose. Notice how Nolan differentiates things like the tree trunks from the negative space.
Colour Mixing

Mix the colours you will need. If you have a Colour Buster, use it to help you find the correct colour combinations.
Shadows

Block in the darker shadow tones. Be sure you know the direction from which the sun is coming.
Background

Mix additional colours (yellow and green) and block in some of the background such as patches of sunlight and leaves. Use Nolan's blurring technique on the greenery. Create the effect of trees in the distance.
Background Snow

Alter your snow colour mixture to include midtones, highlights and shadow tones. Block in the shadowy snow colours first, then fade out the lines. Add darker snow with a dabs and dashes fashion.
Back Trees

Mix the paints needed for the tree trunks in the distance Block in the colours. Use Nolan's technique for creating tree bark. Add highlights to the trunks.
Back Snow Highlights

Mix the snow highlight colours. Paint on the sunny snow patches. Fade out the lines. Add some shadows as you go along.
Enjoying This Tutorial?
Front Trees

Mix the colours for the front trees. Lay the paint onto the trunk. Note Nolan's technique for adding texture to the trunk. Add a darker shade for additional texture on the shadow side and highlights on the sun side.
Foreground Snow

Now you will add detail to your foreground snow. Start from the left and work to the right, adding highlights and shadows as you go. Note how Nolan uses his painting knife to mask a tree trunk when he wants to run a continuous line from one side of the tree to the other.
Footprints

Make depressions in the snow to create footprints. The darkest part will be at the bottom and the shadow side. Lighten and highlight as you get to the top. Fade out any lines.
Twigs and Branches

Take your tree colour and add a few twigs and branches to add character to the trees.
Final Summary

Adjust your highlights at the bottom of the trees.

You May Also Like |


