How to Draw a Fighter Jet in Pencil
Skill Level : 3 Advanced
Medium : Pencil Drawing
Subject : Transport
Tutor : Nolan Clark
Class Length : 2 hours 52 minutes
Avg Rating : No Ratings Yet
Silver Level or Higher Class
Class Description
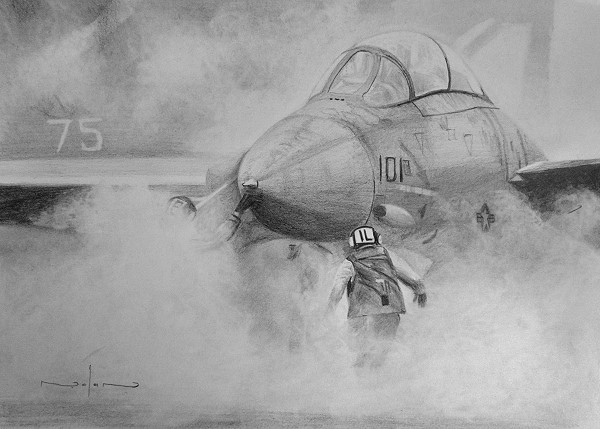
In this class we will draw a dramatic scene of fighter jet aeroplane getting ready for take off.
During the class you will learn:
1) How to draw mist or steam
2) How to make objects recede into the mist
3) How to draw the jet plane
Latest Reviews
No Reviews Yet

Short Class Video
Class Tutorial
Let's draw a fighter jet preparing for an early morning sortie.
There is a lot of mist about so that should be fun to draw.
Drawing the Mist

I start off with a cloth dipped in graphite powder and use it to lay in a basic tonal value behind the fighter jet.
This will become the basis for our mist.

Using an eraser I lift out some random shapes in the background as well as establish the outline of the cockpit and wing.

I then use a rounded part of the eraser and a circular motion to start erasing the mist.
The more you erase in an area, the thicker the mist appears.
To make sure I don't get too many hard edges in the mist I use a super soft mop brush to brush over the mist every now and again.
Where I need to go darker I use the flat edge of a chisel point pencil and a light circular motion to work these contracts in.
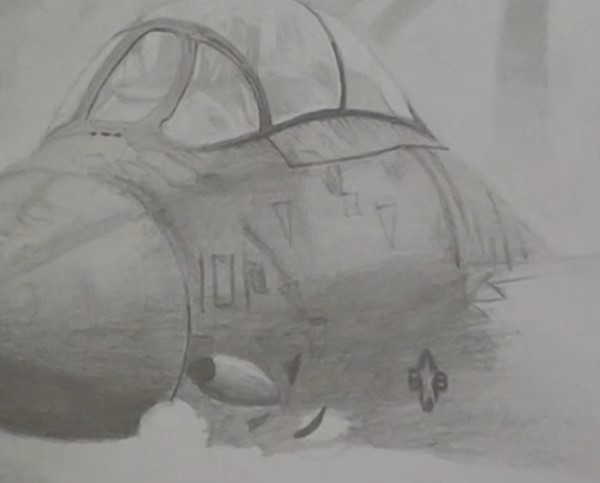
Drawing the Fighter Jet Nose Cone

Moving to the nose cone we have a continuous shading from black to grey.
I first concentrate on getting the shape of the cone correct. The tip must be in exactly the correct position otherwise the cone will look warped.
I plot in a few lines to determine it's position then move on to blending the shadings caused by the shape of the cone.
At this point I am ignoring all of the detail on the cone.

Only once I am happy that the shape and shading is correct do I move on to scribbling in the details.
Notice that all of these details follow the shape of the cone both along it's length as well as around its circumference. Although these details appear trivial, getting their direction correct is just as important as the shading of the cone.
Drawing the Ground Crew Figure in Mist

We can now suggest the ground crew to the left. He is mostly covered in mist so draw the dark visible part of his body, then fade them into the mist.
Enjoying This Tutorial?
Drawing the Cockpit

For the cockpit I start by plotting out of the basic shapes formed by the window frame. Noticed that I am using a 2H pencil to do this as I need to be able to erase these marks if they are not correct.

Once I am happy they are correct I start negatively drawing in the details using my pen shaped eraser. This allows me to better picture the contents as I can see their silhouette.
I will however not trying to draw the contents of the cockpit in high detail. I will simply add a few of the contrasts that I see to suggest the detail.
Drawing the Fuselage of the Fighter Jet

Drawing the body of the fuselage is done in the same way as the cone.
I plot out the positions of the major objects to get their positioning correct.
I then concentrate on getting the shading that shows the shape of the fuselage drawn in.
Once I am happy with the shape, then I add the fine detail.
As I draw, I am gradually moving from a white piece of paper to one which has a multitude of contrasts in it.
When working against a white background, your darks appear darker than they really are.
As the paper fills up with graphite you are better able to judge the tonal values.

As you draw always keep looking over your previously drawn areas to ensure that the contrasts are still correct.
It is normal to go back and do these adjustments, so don't feel you have made a mistake when you spot these tonal value differences.
It was the white of the paper causing your eyes to play tricks on you.
With the jet complete we can move on to the foreground.
Drawing the Foreground Mist

I draw the mist below the plane and start to draw the second ground crew figure.
Drawing the Foreground Ground Crew Member

As with the jet, he is a complex figure so I start by establishing his silhouette and the position of the major features.

Once those are established I can move on to draw the shadings formed by the shapes.
By the time these shadings are complete it must look like a 3 dimensional figure.

After you have a three dimensional figure can concentrate on the smaller details.
I finish off this drawing by suggesting the runway and making the figure disappear into the mist.


You May Also Like |